Pinterested?

Tuesday, June 19, 2012

Chocolate Decadence Cake


Chocolate Decadence Cake: The creamy taste of fudge,
hints of orange zest 
and Grand Marnier, a Mirror Glaze

and Glacé Orange Slices produce this exceptional dessert.
Appearances can be deceiving. What looks like a modest little cake - only one layer, after all - will no doubt be one of the most sinfully delicious desserts you’ve ever made! Save this cake for very special occasions - the approach of the weekend, for example, or getting a truly great haircut, or finding a dollar in the street. Time-consuming but surprisingly simple to make, this cake deserves its name. I wouldn’t say this of most single-layer cakes, but because this one is so rich, a thin slice will do. It easily serves 10-to-12.
Chocolate Decadence Cake with 
Mirror Glaze and Glacé Orange Slices:

4 oz. (112 g) semi-sweet chocolate
½ c. butter 
 c. granulated sugar
Finely grated zest of one large orange, with flesh reserved
1 tbsp. Grand Marnier or other orange-flavored liqueur
3 large eggs
2 c. (6 oz. or 170 g) walnut pieces, finely ground
Have all ingredients measured and ready at room temperature. You will need a grinder or food processor for the walnuts. Grinding nuts in a food processor requires the proper technique. See: http://www.ehow.com/video_12238019_grind-nuts-food-processor.html
Preheat oven to 375 deg. F. Dust a greased, 8-in. layer cake pan with sifted cocoa. Trim and fit a circle of parchment paper inside the pan. Chop chocolate and butter into small chunks. Melt on low power on stove-top (see How to Melt Chocolate in Index) or in microwave safe bowl, heating 2 min. on lowest microwave setting. Stir to complete melting. Stir sugar and orange zest into fully melted, still-warm chocolate and butter. Transfer to medium bowl. Cool 5 min. before stirring in orange-flavored liqueur. Add eggs one at a time, hand-beating after each addition. Stir in ground walnuts. 
Pour into prepared pan, baking 25-to-30 min. on center oven rack. Cake may be slightly soft, but will firm as it cools. When cake is almost cool, run a knife around edge to loosen. Place a wire cooling rack on top of pan, turning pan upside-down so that cake gently drops onto rack. Carefully peel away parchment, allowing cake to cool completely. When cake is fully cool, brush away any crumbs clinging to sides. Do not refrigerate cake at any time - before or after glazing. 
Mirror Glaze:
4 oz. (112 g) semi-sweet chocolate, cut into small pieces 
¼ c. white corn syrup
¼ c. butter, cut into small pieces
Chop chocolate into small chunks. Melt on low power, as above, stirring after a minute and keeping a close watch that chocolate doesn’t burn. When chocolate has nearly melted, add corn syrup and butter, stirring until chocolate and butter are fully melted and well combined. Using the back of a soup spoon, patch the small craters and rivulets on the upended bottom of the cake with a thin coating of glaze to smooth the surface of the cake. Allow to set. 
Place cake on rack on top of a second pan to catch the drips as you prepare to pour Mirror Glaze over cake. Briefly reheat glaze on low power, pouring over cake. While glaze is still warm, use spoon back to smooth cake top and encourage drips to ooze over the edges, down sides, and into pan below. Use spoon back briefly and quickly: Glaze dries fast. Do not try to make fine adjustments once glaze cools. Allow glaze to fully set at room temperature at least 1 hr. before decorating with Glacé Orange Slices.
Glacé Orange Slices:
1-½ c. water
½ c. granulated sugar
1 navel orange, pith removed, membrane intact, in sectioned slices without seeds (see Note)
In a medium skillet on medium heat, bring water and sugar to a boil. Add orange slices, occasionally spooning syrup over them until orange slices start to become translucent, about 20 min. Reduce heat to low,  simmering until syrup thickens and continuing to spoon syrup over slices for a further 10 minutes. Do not turn slices over lest they break. 

Remove slices to drying rack with slotted spoon (Strain, reserve, and chill syrup for future use in brushing freshly baked layer cakes to lock in moisture and flavor). Once the oranges are dry - about 30 min. - measure top of glazed cake to find center. Mark with toothpick or piping nozzle, placing and fanning the best orange slices around it. 

Note: You may want to use two oranges, allowing you to choose the best and most uniformly sized of the orange slices. 

Remove piping nozzle and finish decorating cake in one of several ways:
  • Pipe any firmed, leftover Mirror Glaze (caught by drips in second pan) at cake’s center with oranges radiating from it (this is what I did)
  • Position a professionally made marzipan orange at cake’s center, also with oranges 
  • Position a candied kumquat in its leafy shawl at cake’s center, with oranges. To candy kumquat for appearance and sheen, brush kumquat berry with some of the thickened syrup. Transfer to wire rack to dry beside orange slices.
Trim paper to fit cocoa-dusted pan.

Prepare chocolate and butter.

Prepare orange zest; set orange aside.
Stir granulated sugar into melted chocolate.

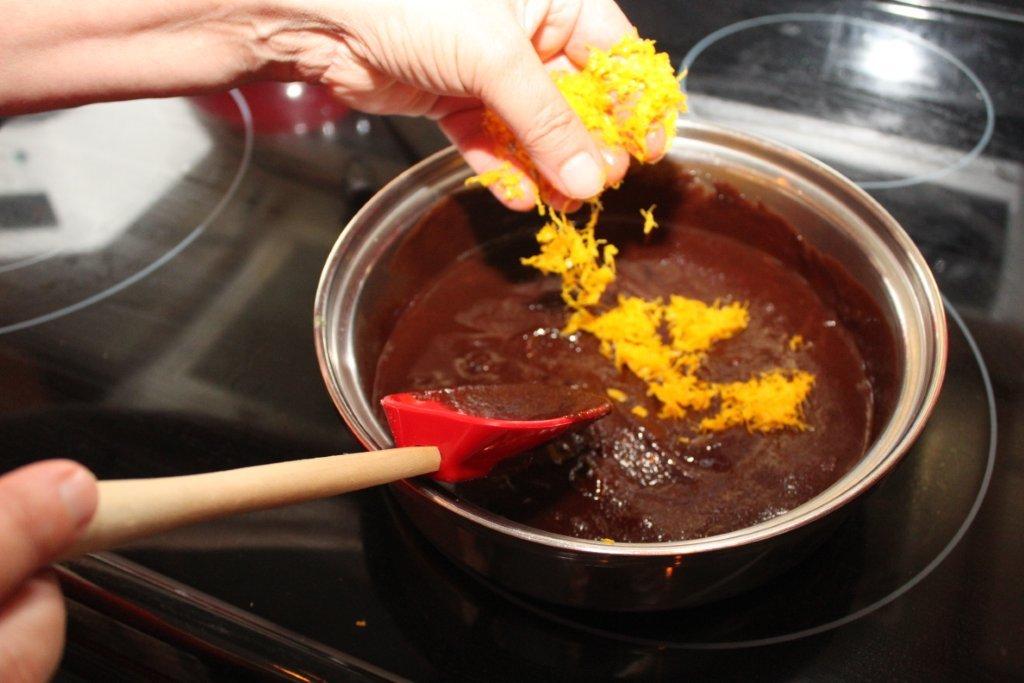
Add finely grated orange zest.

Grind walnuts.
Add eggs one at a time, hand-beating between each addition.

Stir in ground walnuts.

Pour into prepared pan. Bake 25-to-30 min.
Gently peel away parchment paper.

Prepare glaze on stove-top or in microwave.

Fill air-bubble craters and rivulets on cake; allow glaze to set.

Gently reheat glaze and begin pouring over cake.
Smooth warm glaze, allowing to drip over sides.

Section reserved orange.

Simmer in sugar syrup, taking care not to break orange sections.

Remove to drying rack with slotted spoon.

Mark cake center, fanning dried, glazed oranges around it.

Pipe chocolate onto previously marked center of cake.
View of completed cake from above.

Monday, June 18, 2012

Sweet Potato Fries

I feel so guilty. I never thought I would do this. It violates everything in which I believe. I’ve just spent $6.99 to buy a 22-oz. package of fresh, raw, peeled, washed, crinkle-cut, sweet potato slices. 
It was the crinkle cut that hooked me - kinda flirty, kinda cute. I thought how good those crinkle cuts would feel in my mouth - and how good they’d look on the table. This will be a dalliance, rather than a life-long relationship, I thought. I could have peeled and cut an ordinary sweet potato for less than $1, but the temptation to bust loose from same-old, same-old was overwhelming. 
If I’ve strayed from the straight and narrow, spending more than I should have to buy sweet potatoes, then mea culpa - but guess what?  I almost never buy sweet potatoes, did this time, and learned that they’re outstanding eaten naked (the crinkle-cuts, Dollinks - not me). That means no dip, no sauce, no seasoning, no nuttin’. 
Baked in their skins without salt, sweet potatoes are low in sodium and very low in saturated fat and cholesterol. They contribute dietary fiber, Vitamin B6, Vitamin A, Vitamin C, potassium, and manganese to your good health. Try them raw in salads, or lightly steamed as a side dish.
So now I have something else about which to feel guilty. By adding olive oil and salt to these sweet potatoes, as Ive done below, I’ve reduced their nutritional value. I promise the remaining crinkle-cuts will go directly into salads!
Sweet Potato Fries:

Sweet potatoes, as required
Olive oil, as required
Sea salt, to taste 
Coarsely ground pepper, to taste
Preheat oven to 425 deg. F. If using whole sweet potatoes, peel and trim into french-fry widths and lengths (or use pre-cut sweet potatoes, as I did). Rinse and blot completely dry (pre-cuts need no rinsing). Place raw, sliced sweet potatoes in bowl, tossing with just enough olive oil to coat lightly. Season to taste, combining well. Bake in a single layer on parchment-covered baking sheet for 15 min. Turn and bake a further 5-to-10 min. Fries should be crisp - not soggy. If they’re soggy, you’ve used too much olive oil. Do not share the oven with another dish, or your fries will go limp with the moisture the other dish vents. You may need to try this recipe a couple of times to get the balance of ingredients and timing that suits your taste.


Love at first sight - and at first bite!

Combine with olive oil and seasonings; bake as recipe directs

Sunday, June 17, 2012

Shrimp and White Fish Chowder

This year, sunshine has not been a strong point in the Time Zone and at the Latitude Where I Live. In fact, we’re calling this month Junuary. Because it’s been raining longer than 40 days and 40 nights and all the available arcs have been rented, we’ve been toughing it out with cold-weather comfort foods. This simple Chowder nicely fills the bill!
Shrimp and White Fish Chowder:
4 tbsp. butter or margarine
1 c. chopped onion
1 green (“spring”) onion, finely diced
2 large potatoes, peeled and diced
2 stalks celery, diced
4 large or 10 small mushrooms, sliced
¼ c. all-purpose flour
4 c. fish stock
2 c. light cream
½ lb. any firm-fleshed raw white fish such as snapper, cod, or halibut, in bite-sized chunks
½ lb. fresh or thawed uncooked, shelled, deveined shrimp or prawns
⅓ c. finely chopped fresh parsley
2 tsp. dried chervil
Salt and coarsely ground pepper, to taste
Melt butter or margarine over medium heat in large, heavy saucepan. Add onions, potato, and celery, stirring until onions are translucent and celery begins to soften. Add mushrooms, cooking a further 2 or 3 min. Stir in flour, being careful not to burn. Gradually add fish stock, stirring well as stock comes to a boil. Lower heat to simmer. Cook until potatoes start to soften. Add and simmer white fish 2-to-3 min., stirring constantly. Add shrimp or prawns in final minute; they will turn pink almost instantly. Quickly stir in cream, parsley, chervil, and seasonings. Serve at once. Serves 6.  


Prepare prawns: For on-the-dock photos, see post below!

Prepare one large potato

Prepare celery. And now it's time to start!

Melt butter in large, heavy pot

Add onions ...

Potatoes ...
Celery ...

And mushrooms

Stir in flour

Slowly add fish stock; simmer

Stir in cream 

Stir in fish. Simmer briefly before adding shrimp or prawns

Time for the parsley ...

Chervil, salt, and pepper

Serve immediately
Posted below: A dock-side look at How to Peel and Devein Fresh Shrimp.

How to Peel and Devein Fresh Shrimp

Many of us are so far removed from hunting, trapping, and growing our food that the process of getting it into the bag, bottle, or box we buy seems very mysterious. When we trapped some fresh shrimp this weekend, Ron photographed what happened next.


Grand-daughter Sydney, 7, hoists live shrimp from trap
Grasping shrimp firmly at midpoint, Nicole ...

Quickly twists and removes head

With head about to be discarded, only body and tail remain

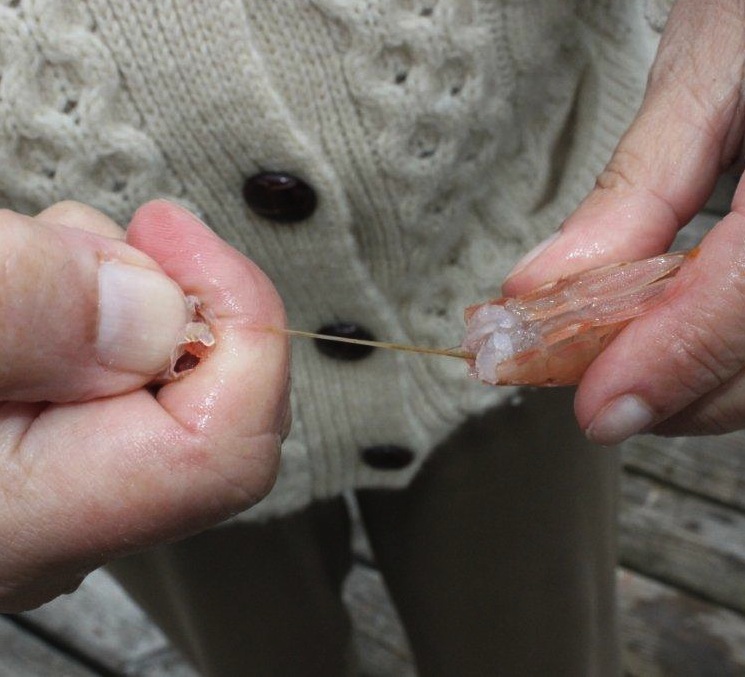
With shrimp lying belly up, Nicole squeezes body just  
above tail, bending tail back to slowly extract tail and 
thread-like vein. Discarding both, she peels away shell.  
The entire process? Thirty seconds or less.

Friday, June 15, 2012

Tahitian Tenderloin

Ah, Tahiti! Beaches ... bare feet … sun sinking slowly into the west! Never been there. Probably never will be. This recipe is quite likely the closest I’ll ever get there from here. I cut this “tenderloin” from the massive slab of pork I sectioned a few weeks ago (Miss Piggy Goes to Market, blogged April 25, 2012). Come to think of it, that piece of pork did look a lot like Marlon Brando, who lived in Tahiti and had a Tahitian wife. But back to pork tenderloin.
As Ron reminded me, pork tenderloin is the piece of meat cut along the top of the rib cage, so I didn’t really carve a “tenderloin” from the leg and shoulder I sliced up - I just carved the meat to look like one. What I actually had was a chunk of pork roast. This marinade works well with chops, roasts - and yes, tenderloins. Even though the cut wasn’t really a tenderloin and the marinade isn’t really Tahitian, the name and the recipe and the result pleased me enough to blog it for you. I told Ron that if he didn’t stop reminding me of technicalities, I would feed him my infamous recipe for Leg of Tongue. It begins: Place foot in mouth, chewing words well ...

This recipe requires extra time 
for marination

Tahitian Tenderloin:
2 tsp. oil
¾ c. non-alcoholic cooking sherry
¼ c. dark soy sauce
¼ c. canola oil
1 tbsp. maple syrup
1 or 2 large cloves garlic, minced fine
¼ tsp. oregano
¾ tsp. ginger (fresh or powdered)

Preheat oven to 350 deg. F. Sear “tenderloin” (or chops, or small pork roast) in large cast iron or ovenproof skillet on medium-high heat in 2 tsp. oil until well-browned on all sides. Remove from heat. Whisk together remaining ingredients. Brush tenderloin or other cut of pork with marinade, pouring remainder over. Tent skillet with foil, creating a tight seal. Place skillet in oven, roasting tenderloin 30-to-40 min., or until meat thermometer registers 150 deg. F.  Transfer pork to carving board, cutting into thick slices. Discard marinade - do not re-use.

Prepare marinade: Cooking sherry ...

Soy sauce ...

Canola oil ...

Maple syrup ...

Garlic ...

Oregano ...

Ginger ...

Whisk ... roast ...

Slice and serve! A little more, Marlon?