Pinterested?

Monday, August 29, 2022

Ron’s Zucchini Relish

Originally on this blog in 2016, this is one of the most popular recipes I’ve ever published. As Summer segues into Autumn, and the zucchini harvest begins, now is the time to make this colorful, home-preserved relish. So I’m delighted to reprint ...

Ron’s Zucchini Relish:

12 c. (3 L) skinned, seeded, coarsely shredded zucchini
2 sweet green bell peppers, diced
2 sweet red bell peppers, shredded
1/4 sweet orange bell pepper, shredded
4 c. (1 L) coarsely ground onions
1/3 c. (80 mL) pickling salt
1 tsp. (5 mL) turmeric
1 tsp. (5 mL) curry powder
1 tsp. (5 mL) celery seed
1 tbsp. (15 mL) cornstarch
1/2 tsp. (2.5 mL) finely ground pepper
4-1/2 c. (1.125 L) granulated sugar
3 c. (750 mL) white vinegar

In large, non-aluminum container, stir pickling salt into prepared vegetables. Let stand overnight. Drain, rinse with cold water, and drain again, allowing to drip naturally. In large separate bowl, combine turmeric, curry powder, celery seed, cornstarch, pepper, sugar, and vinegar, mixing well. Stir into vegetables. Boil 20 min. 

Pour hot vegetables into hot sterilized jars, using hot rings and lids, leaving 1/2-in. (1.25 cm) head space. Process 12-to-15 min., following standard, approved canning method. Remove from canner; cool and wipe jars, tightening rings after 24 hr. Yields six pint jars (six 500 mL jars) Zucchini Relish.

For more zucchini recipes, see One Click: Zucchini.


A food processor saves masses of time

in grating these ingredients!


The colors, dicing, and shredding of the veggies

are part of what makes this relish so delicious.


Rinse vegetables after they’ve sat overnight in salt.


Lower hot jars and hot relish into processing bath.


Ready in a flash, out come the jars!


And here’s the superbly delicious homemade relish!


Beet and Cucumber Summer Salad

I can’t imagine a more delicious salad to serve while Summer’s still with us! It’s light and refreshing and a dinner party winner, even among beet haters. 

This is a muscular salad - not some genteel tea-party goodie. You don’t fool around with beets! And so, I prefer to use thicker, brawny slices of peeled, seeded cukes rather than the dainty, seedless English cucumbers I normally suggest.

About that dressing: I wouldn’t keep it more than two days. It seems to thin out and lose its flavor. Use the rest on a tossed salad or in coleslaw you plan to eat in a single sitting. Enough! Here’s what you've been waiting for!

Beet and Cucumber Summer Salad:


To Prepare the Salad:


4-to-6 medium-to-large beets, rinsed, peeled, and chunked into  (approximately) 1 in. (1.5 cm)-to-1-1/2 in. (1.27 cm) pieces  (see Note: How to Cook Beets)

1 medium red onion, sliced thin, with the slices separated as rings and halved or quartered

1 medium-to-large seeded cucumber, peeled and cut into 3/8 in. (0.95 cm) slices

Salt and pepper, to taste


Set aside a few slices of prepared onion and cucumber before proceeding. To work bowl, add prepared beets, onion, and cucumber, minus the onion and cucumber set aside. Cover and refrigerate all while assembling dressing. 


To Prepare the Dressing:


1/2 c. (125 mL) sour cream (full fat sour cream holds up better than its anemic cousin)

1/4 c. (60 mL) mayonnaise (ditto)

2 tbsp. (30 mL) red wine vinegar

1 tbsp. (15 mL) Dijon mustard

1 tsp. (5 mL) hot horseradish (don’t wimp out on me, now!)

2 tbsp. (30 mL) dried dill weed

2 tsp. (10 mL) granulated sugar

Additional salt and pepper, to taste


To small work bowl or covered jar, add dressing ingredients, stirring or shaking until well combined. Don’t be tempted to drown the beets, cukes, and onions in dressing: Pour some and toss lightly; pour a little more and toss lightly until it looks just right, continuing to keep reserved ingredients aside. Cover and refrigerate 3 or 4 hr. before serving, so flavors can blend.


Transfer to serving bowlGive this salad one final, light toss before taking it to the table. Poke reserved slivers of red onion and a few halved cucumber slices here and there as décor, allowing the reserved red onion and cucumbers to be visible after the salad’s been tossed.


Beet and Cucumber Summer Salad. 

Note: How to Cook Beets: Is there an official method? I don’t know, but this is what I do. Slice away each beet’s roots and tips, exposing a sliver of skin. Do not slice beets any further unless they’re the monster that ate your neighbor. In that event, cut them in half and hope for the best. 


In a pot, slip beets into enough boiling, salted water to entirely cover beets. I sometimes add a splash of white vinegar and say a prayer that this will help them retain their bright red color. 


Reduce heat to low boil, checking every 10 minutes (give or take) to ensure water remains at the boil. Check that beets are ready by piercing them with sharp paring knife after 30-to-45 min. Fresh beets will cook more quickly than old, hard beets, which take about an hour to cook. 


Remove beets from pot with a slotted spoon, saving the boiled water for now. Rinse beets with cool water just until they’re tolerable to pick up (I wear disposable, non-latex latex gloves for this job). The skins of fully cooked beets should slide right off when they’re done. 


If not, you’ll have a fight on your hands, paring away the skin and destroying the perfect appearance of a smooth, shiny beet. If you’d rather not do that, bring the water in your pot to the boil again, returning the stubborn beets to the pot to show them who’s boss. 


If that doesn’t work either, compost the old beets in favor of  younger, prettier, more cooperative ones. Alas! This is the way the world works.


Further Note: You may also want to try this Chilled Beet Saladhttps://nicoleparton.blogspot.com/search?q=chilled+beet+salad


Tuesday, August 23, 2022

How to Peel and Prepare Garlic in Quantity

I was thinking about garlic, this morning … Doesn’t everyone? (No, they don’t). Recipes occasionally call for “grated garlic” - a  nuisance! Below is what those recipes mean when they say that. 

When I work with a quantity of garlic, I use use three favorite tools: A garlic peeler, a self-cleaning garlic press, and a beautiful little rough-sided dish I bought at a farmer’s market in France. My friend Alice bought me another: I love them both. Those little dishes are garlic graters. 


Now and then, you’ll see teeny-weeny toy-sized garlic graters: Use them at your peril, unless you’re okay with having blood spurt from your index and middle fingers.   


As I reached for a fresh garlic clove yesterday, I thought about those handy tools. The humble garlic clove, as you likely know, is a section of a garlic bulb. I was in no hurry to make dinner, so thought: “Why not?” and began to section and skin three large bulbs - perhaps 40 cloves - on the premise that a few minutes’ work now would make things easier when I needed a garlic clove and didn’t have as much time as I had then. 


Ta dah! That’s where my time-saving tools came in!


If I have just one or two garlic cloves to peel, I won’t bother getting out my garlic peeler: Approximately 1 tsp. (5 mL) of grated or minced garlic equals one medium clove. 


But when I prepare garlic in bulk, a garlic peeler is very useful tool. Resembling a large, floppy cannelloni made of soft, flexible, rubberized material, a garlic peeler will quickly separate garlic cloves from their skins. The peeler hastens a tedious job and keeps your fingers free of garlic smells. Voilà! Buy one.


Do you have a garlic press? Mine wasn’t expensive. I paid $17 for it in a restaurant-supply house in Washington state - more than you’d pay for an “ordinary” garlic press of lesser quality, but less than I expected to pay for what I got (These have now risen in price, but not wildly. If your local kitchen store doesn’t stock them, Amazon does, online). 


That’s my garlic press in the second photo. Unlike ordinary garlic presses (I sound like an Infomercial!), this heavy-duty press has two compartments - one to mince, one to slice - as well as two large hammers that bear down on the cloves and a small plastic press that cleans the garlic residue from each hole in the press. 


And here’s the mark of smart design: The plastic press tucks away for storage into a small depression of the garlic press, so you’ll never misplace it. I’m very, very happy with this kitchen tool. 


When an accident left one of my hands weaker than the other, I realized my former garlic press required more strength than I had. With this heavy-duty press, a light squeeze does the job. Its brand name is “Amco Houseworks.” (And now I sound like a shill!)


What do I do with all that peeled, minced garlic, Nicole? I thought you’d never ask! There it is, in the jar in the third photo, and there’s my hand, pouring olive oil over it - just enough to cover and preserve the minced cloves. Label and date. 


A labeler is one of my favorite kitchen tools: I date and label everything! So into the fridge go my jars of whole or grated garlic cloves! No processing or canning required … Just screw the lid on the jar.


I’ve safely stored garlic cloves in olive oil for one year. 


Once the cloves are all used up, the remaining garlic-flavored oil is delicious in salads or for dipping slices of baguette (with or without balsamic vinegar). 


I love the little plate I bought at a farmer’s market in Provence France so much that my friend Alice bought me another! These lovely little plates are ceramic garlic graters.


The word “ail” inscribed on the yellow plate means “garlic” in French. The idea is to rub a peeled garlic clove over the rough part of the plate. Stir in a little soft butter, and you’ve got garlic butter. Frankly, I find this too much work, but I like the plates and use them for other purposes - like pouring in my garlic-infused oil for dipping that baguette! 


The garlicky oil also makes a great salad dressing, as well as adding flavor to Pesto Crostini.  


Garlic peeler.

Garlic press.

Olive oil over minced garlic.

Whole garlic in olive oil.

Garlic graters.


Saturday, August 20, 2022

Ron’s Sweet Chili Rice

When Ron invented this easy, delicious recipe the other day, I told him he was Master of the Kitchen and said: Sayonara Cooking!” and left. Ron loves to cook and does such a great job that I no longer need to. Guilt is sure to draw me back, but not with gusto.

Ron’s Sweet Chili Rice


Ron’s Sweet Chili Rice:


1-1/4 c. (310 mL) long-grained, white rice (raw)

1-1/2 c. (375 mL) cold water

6 slices canned, chopped jalapeño peppers (bits and pieces - not whole jalapeños!)

1/3 c. (80 mL) sweet Thai chili sauce

1/4 c. (60 mL) fresh parsley, stemmed and chopped

1/4 c. (60 mL) fresh cilantro, stemmed and chopped

Salt and pepper, to taste


Rinse rice in cold, clear water to remove excess starch that makes it gummy. Cook rinsed rice in rice cooker or in pot on stove (Unsure? See How to Cook Rice). 


Combine remaining ingredients except salt and pepper. Stir into cooked rice, seasoning as desired.

Sunday, August 14, 2022

Meatball-Tomato Soup

It’s Summer in the Northern Hemisphere, but Fall awaits. Where we live, it sometimes arrives early - cool temperatures, heavy cloud cover over leaden skies, rain ... The transition from summer to Fall can be rapid. Now that I’ve single-handedly destroyed our tourism industry, let’s move along.


If you’ve been enjoying a warm Summer where you live, keep this excellent recipe for Fall and Winter. If you live in the Southern Hemisphere, clip it (watch those computer wires, dearies!) and make it now. 


Meatball-Tomato Soup is tasty, nourishing, inexpensive, and easy to make. A year or so ago, I discovered that Costco’s frozen meatballs are every bit as 

good (and likely less expensive) as those I make from scratch. Trust me when I say the recipe in this blog for Sophia’s Meatballs (and the sauce! Oy, the sauce!) is outstanding, but I’m not getting any younger and am lazing around more than I once did.


It goes without saying (but I will) that the proportions for this recipe are adjustable. Slap it around until it begs for mercy: Use as much onion, celery, and canned or fresh tomatoes as you like (or have in your pantry). Which is why this is a “no recipe” recipe, with no specific quantities other than “as required.” Just don’t omit the meatballs and all will be well.


Meatball-Tomato Soup:


Meatballs, homemade or commercial

Olive or canola oil

Onion, diced fine

Fresh carrot (singular or plural), peeled and diced 

Celery, angle-sliced into 3/8 in. (1 cm) pieces

Crushed tomatoes with juice, undrained, commercially prepared or homemade

Spaghetti sauce, commercially prepared or homemade

Beef broth, commercially prepared or homemade

Italian seasoning

Salt and freshly ground pepper, to taste 

Dry, short pasta such as fancy, twirled macaroni (see Note)

Fresh parsley or chives or basil, chopped (optional, as topping)

Grated Parmesan (optional, as topping) 


In large, medium, or small skillet (see Bossy Pants Note), warm oil over medium heat. Fry the H out of the meatballs, turning often to brown all sides. Remove from skillet, draining   fat on double-folded paper towel. Don’t wash skillet.


Fry onions, carrots, and celery in skillet over medium heat until softened, about 5 min. Transfer to medium-sized pot. Stir in crushed tomatoes with juice, spaghetti sauce, broth, seasonings, and meatballs. Simmer 10 min., allowing flavors to blend. 


As tomato-meatball mixture simmers, bring large pot of well-salted water to a boil, adding pasta to it. Pasta should take about 10 min. to cook; if not, give it another couple of minutes to be “al dente” - tender enough to chew, but not overly soft. 


Add cooked, drained, hot pasta to sauce mixture, mixing gently but thoroughly. Transfer to heated pasta bowls, If you happen to be feeling lah de dah or fancy-schmancy the day you make this, top with parsley and grated Parmesan. Serve at once.


Note: Far be it for me to tell you how much to use, but remember! Dried macaroni swells to xx times its volume after cooking. Don’t use a heavy hand as you add it.


Bossy Pants Note: You’re in charge - not I! Decide how many meatballs you want and you’ll know the size of skillet and pot you’ll need. I usually say “Go big or go home!” But then I realize I already am home, so I often scale recipes down.

Monday, August 8, 2022

Cucumber-Tomato Salad

The perfect summer salad! Wait for it, those of you in the Southern Hemisphere!

Cucumber-Tomato Salad

 Cucumber-Tomato Salad:

To Prepare the Salad:


1 long English cucumber, unpeeled (or 1 salad cucumber with seeds), sliced 1/3 in. (0.85 cm) thickness, each slice halved 

2-3 large tomatoes, cut into eighths 1/2 small red onion, sliced 1/4 in. (0.6 cm)  and cut into 1/4 in. (5 cm) widths 


To Prepare the Dressing: 


1 tbsp. (15 mL) fresh or dried herbs (optional) 

2 tbsp. (15 mL) olive oil 

1 tbsp. (15 mL) red wine vinegar 

Salt and pepper, to taste


Toss with cucumber slices and tomatoes. Cover and refrigerate several hours in advance to allow the flavors to blend. Toss again just before serving.

Thursday, August 4, 2022

Cucumber-Cabbage Slaw

This delicious summer slaw came to me in a rare moment of actually wanting to cook (!), yesterday. With cabbage as its basis, I made this slaw using veggies already in the fridge: Go ahead and make it with whats in your fridge

The dressing is thick, so dont overdo it. Use only what you need and save the rest for another day. If your hand slips, slice in more cabbage until it looks right.” 

Prepare, dress, and toss this salad well ahead of time, allowing the flavors to blend for several hours. Give it a final toss before serving.

Cucumber-Cabbage Slaw

Cucumber-Cabbage Slaw:

To Prepare the Coleslaw:


1/4 medium raw green cabbage, sliced thin 

1 small red onion, diced fine

1/4 raw cauliflower, cut into small, whole flowerets 

1/2 long English cucumber, peel on and sliced thin

Three or four red radishes, sliced thin

1 medium carrot, peeled, angle-cut and sliced thin, with each sliced cut lengthwise into thirds


To Prepare the Dressing:


1/2 c. (125 mL) sour cream or plain Greek yogurt

1/4 c. (60 mL) mayonnaise

2 tbsp. (30 mL) red wine vinegar

1 tbsp. (15 mL) red wine vinegar

1 tbsp. (15 mL) Dijon mustard 

1 tsp. (5 mL) prepared horseradish

2 tsp. (10 mL) dried dill weed

2 tbsp. (30 mL) granulated sugar (see Note)

1/8 tsp. (1.2 mL) salt and pepper (or to taste)


Shake together in covered jar. Pour gradually over slaw mixture, tossing as you go. Although you’ll be tempted to use it all, you likely won’t need to. 

Note: You may assume there’s too much sugar in this recipe. There isn’t; don’t reduce it.

Saturday, July 9, 2022

Prawn and Asparagus Salad

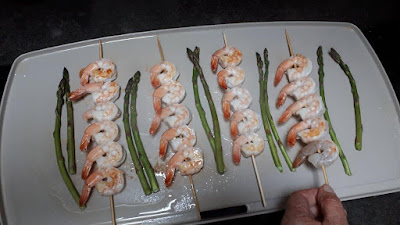
A great hit at dinner parties, this simple salad is easy on calories while rich in taste and appearance. Large, frozen prawns are far cheaper than fresh ones, so the frozen ones are  what I use, thawing them overnight in the fridge. 


If your grocer doesn’t stock Bocconcini cheese balls (aka “pearls”), use a small scoop to carve them from a large ball of soft Mozzarella (Bocconcini”)I use seven or eight prawns per main dish serving (Even 10! Live on the edge, Nicole!)


Only the prawns need last-minute preparation: Cook them on lightly greased skewers on high heat: I use a griddle rather than fussing with a skillet.


 Griddle-sear prawns and asparagus.

Skewering prawns makes their placement on the salad much quicker. I steam the asparagus or - if the stalks are especially thin - sear them beside the prawns. Make things easy on yourself with a high-quality prepared salad mix (rather than ripping and gripping and snarling and swearing because you
’re running out of time).


Adjust the quantities of the salad and the dressing recipe as you prefer. Served on small plates,  and in smaller quantities, this also makes a terrific appetizer. 
Once you’ve made this dish, youll want to serve it over and over again!


Prawn and Asparagus Salad:

Over individual plates of mixed greens, arrange: 

Prawns, pan-seared on the stove just until they turn pink

Asparagus, cooked briefly, chilled on and under ice, and patted dry with a paper towel (see Asparagus Notes)

Cherry tomatoes, halved

Bocconcini pearls

Drizzle with light oil-based dressing of your choice (see Dressing Note).

Asparagus Note: Thin asparagus boiled in a skillet need about one minute; thicker asparagus need slightly more, but be careful not to cook them through. These should be al dente (slightly crunchy-crisp).


Further Asparagus Note: Eating unsauced, firm asparagus with your fingers is considered polite, one stalk at a time.


Dressing Note: Salad dressings flummox me. Never quite sure which to choose, I generally ask husband Ron to provide something. So this simple something was it! Adjust the quantities as you need to; this makes enough for two servings.


Prawn and Asparagus Salad Dressing:


2 tbsp. (30 mL) soy sauce

1 tbsp. (15 mL) granulated sugar

2 tbsp. (30 mL) rice vinegar

1/2 tsp. (2.5 mL) garlic powder


Shake ingredients together in covered jar until well combined. Let sit in fridge at least 30 min. to allow flavors to blend. Drizzle over prepared salad just before serving.

Friday, July 8, 2022

Sour Cream Cucumber Salad

There are several versions of this excellent salad. I like mine, best!


This recipe  requires extra time 

for marination


Sour Cream Cucumber Salad:

2 large long “English” (seedless) cucumbers, skin on

1 small white onion, finely minced

1/2 c.(125 mL) sour cream

1/4 c. (60 mL) mayonnaise

2 tsp. (10 mL) white wine vinegar

2 tsp. (10 mL) fresh lemon juice 

2 tsp. (10 mL) granulated sugar

1 tsp. (5 mL) dried dill weed

1 tsp. (5 mL) salt

1/4 tsp. (1.25 ml) coarsely ground black pepper


Thinly slice cucumber. Place one layer of cucumber slices into ceramic or glass pie plate. Sprinkle with salt. Repeat layering and salting until all cucumber slices have been used. Place cello wrap directly over cucumbers. Cover with a second, smaller pie pan, adding pie weights, marbles, or water to weight the pan down. Place in refrigerator for several hours. Remove weight and drain liquid from cucumbers, rinsing away excess salt with cold water. Drain well. 


Add remaining ingredients to small bowl, until thoroughly mixed. Pour mixture over chilled, drained cukes, combining gently. Cover and chill at least 1 hr., allowing flavors to blend. Just before serving, lightly toss again. Serves 4. 

Thursday, July 7, 2022

Pork Stir-Fry à la Nicole

Whaddya do with a hunka-hunka ground pork? I had 1-3/4 lb. (806 g) of it taking up space in the freezer. Combining it with an equal amount of ground beef would have been the usual thing for making meat loaf, meat balls, or burger patties, but with no ground beef on hand, I flapped around, wringing my hands, moaning: What can I do-o-o …?


Go online.

Grateful to have found this largesse in the freezer, I was also grateful to www.frugalnutrition.com for the clever idea of turning such a large amount of ground pork into a stir-fry. If truth be told, I actually had twice the ground pork this recipe calls for - something I discovered too late to do anything about it. 


Doubling the pork didn’t seem to matter because everything turned out fine. As cooks often do, I modified the recipe by using whatever I had lurking in the fridge. This was the result.


Pork Stir-Fry à la Nicole:


1 c. (250 ml) uncooked brown rice

1-to-2 tbsp. (15-to-30 mL) canola oil

3/4 lb. (340 g) ground pork or other ground meat (see Meat Note)

1/2 medium white onion, peeled, sliced into wedges

1-1-2 c. (375 mL) sliced mushrooms (see Mushroom Note)

1 c. (250 mL) carrots, rinsed, peeled, and cut into (thick-ish) match stick size (see Shocking Carrot Note)

4 c. (1 L, give or take), angle-sliced celery with leaves, or other greens including (but not limited to) bokchoy, kale, trimmed asparagus stalks, parsley, etc. 

3 or 4 tbsp. (45-to-60 mL) fresh ginger, peeled and minced fine

2 or 3 cloves fresh garlic, peeled and minced fine

1/4 c. (60 mL) soy sauce, divided

3 tbsp. (45 mL) rice wine vinegar

1 tsp. (5 mL) chili flakes

Sesame seeds, toasted, as garnish

3 or 4 green onions, angle-sliced, as garnish


Have all ingredients arrayed and prepared in advance. Ensure Angle-slice celery slightly thick, rather than thin.


Set well-rinsed rice over stovetop or in rice cooker. If you’re unfamiliar with cooking brown rice, see my post for How to Cook Rice (https://nicoleparton.blogspot.com/2012/01/how-to-cook-rice.html) and specifically the section on How to Cook Long-Grain Brown Rice. The amount of brown rice in this recipe will require 1-1/2 (375 mL)-to-2 c. (500 mL) water or chicken stock. 


To wok set over high heat, add canola oil and ground meat, breaking up meat until browned. Remove meat from wok; set aside. Pour off all but 1 tbsp. (15 mL) of oil.


Reduce heat to medium-high. Add onions and mushrooms, sauteéing onions are slightly softened. Add mushrooms, continuing to toss until mushrooms are heated through. Add carrots and celery stalks, tossing a further 3 or 4 min. Stir in ginger, garlic, half soy sauce, rice wine vinegar, and chili flakes. 


Reducing heat to medium, cover wok, cooking 5 min., or until carrots and celery are partially cooked, but still crunchy. Remove wok cover, sprinkling remaining soy sauce over dish. Garnish with sesame seeds and green onion. Serves 6.


Meat Note: Dork that I am, I used 1-3/4 lb. (806 g). Over a couple of days, we gobbled up every bit of this very “meaty” stir-fry, not realizing the difference.


Mushroom Note: Gather ’round! Let me tell you how I prepare mushrooms to save time when I need it. Buying mid-sized cremini mushrooms in quantity - this works with most types of mushroom - I dust off the dirt, cutting them into a uniform size with an egg slicer (Younger people may prefer a knife, but I’m old and decrepit and find an egg slicer easier). 


In large skillet, fry mushrooms in butter or margarine. Transfer cooled mushrooms and melted butter or margarine to small freezer-safe containers holding 1/2 c. (125 mL) each. Label and freeze for conveniently quick use in recipes such as this.


And now a full-blown rant!


Shocking Carrot Note: Ignore what’s below if you’re content with the way your carrots smell. Read it if you feel their smell has recently changed for the worse. This blog is read worldwide, so what I’m about to say may or may not apply to you.


I recently came across a couple of interesting questions to Google. The first question was written and answered in 2010: What are carrots supposed to smell like?


Here’s what https://seattlelocalfood.com/2010/11/07/carrots/ replied: 


“Perfect carrots smell like spring, like sweetness in the back of your throat, like everything a carrot seed dreams of growing up to be. Smell your carrots, folks. If they smell good, they'll taste good.”


The second question was written and answered in June, 2022: Why do my carrots smell weird?


Among the several reasons: Your smelly carrots may have been treated with essential oils. hat, my friends, strikes me as unacceptable.


https://www.sciencedirect.com/science/article/abs/pii/S2214799322000236


The journal Current Opinion in Food Science features a study headed Use of essential oils against food-borne spoilage yeasts: Advantages and drawbacks. The paper suggests one reason why not only carrots, but other foods, may smell “different.” 


“Recent scientific studies have demonstrated the effective application of essential oils (EOs) as natural preservatives for controlling spoilage yeasts in foods as: fruit and fruit juices, raw vegetables, cereal-based products, meat-based products, and dairy products. 

“Notwithstanding, the main limitation in using EOs, especially when applied at high concentration, is related to their strong impact on the sensory traits of the treated foods. Hence, to preserve food quality and to assure antifungal activity, the optimal formulation, concentration, and combination of each EO should be defined for each specific food matrix …”

The article summarizes EOs as “natural aromatic volatile compounds extracted from different parts of plants … including compounds containing nitrogen and sulfur with unpleasant odors (e.g. amines, thiols, etc.) …

“Because of the chemical nature of the active substances contained in EOs, great attention to their proper selection for food preservation must be paid. Indeed, not only the aroma and taste may be altered by the use of EOs as protective substances against spoilage yeasts, but also the color, texture, general visual perception as well as tactile and mouth feel during consumption. It is noteworthy that aroma and associated taste have a crucial impact on consumer acceptability of food.”

Conclusion: I first noticed an offensive smell in packaged, peeled baby carrots, several years ago. I stopped buying them. Unless your grocer has an advanced degree in chemistry, s/he probably won’t care. If your carrots smell foul, switch to organic.  

If your local newspaper features a consumer columnist, or your radio or TV station has a consumer broadcaster, draw this to his or her attention. Sure, it’s nerdy science stuff, but essential oils and food don’t belong together. 

Who says? The US Food and Drug Administration, that’s who. Of course, it’s a question of degree and quantity, but when food starts to stink … Too much is too much.