Pinterested?

Saturday, April 19, 2014

Pineapple Delight

I’ve felt guilty about keeping this recipe to myself for too many years, and am happy to share it with you! It’s tremendously easy to make: If I were rating it, I’d judge it outstanding. After a single nibble, the men on our Anonymous Taste Testing Panel swooned and crashed to the ground, quite overcome. Although the women on the Panel (who normally get their calories from salad dressing) collapsed in a paroxysm of pleasure, they were still able to rate it just as highly as I do. If you make it once, you’ll want to make it over and over again. I’m of course referring to this dessert, Dollinks.  


Pineapple Delight:


To Prepare First Layer:


1-3/4 c. (330 mL) graham wafer crumbs

3 tbsp. (45 mL) granulated sugar

1/2 c. (125 mL) butter, melted


Preheat oven to 350 deg. F. Using a medium bowl and a fork, combine graham wafer crumbs, sugar, and 1/2 c. (125 mL) melted butter. Pack mixture into 9 x 12-in. (2.5 x 30 cm) pan. Bake 5-to-7 min. Cool to room temperature before freezing 20 min. 


To Prepare Second Layer:


1/2 c. (125 ,L) butter, at room temperature

1-1/2 c. (375 mL) sifted icing sugar (“confectioners” sugar or “powdered” sugar)  

2 eggs

1/2 tsp. (5 mL) vanilla extract


In a clean medium bowl, cream 1/2 c. butter, gradually beating in sifted icing sugar. Add eggs one at a time, continuing to beat until mixture is smooth and creamy. Add vanilla, combining well. Spread and smooth over crumb base. Return to freezer a further 10 min. 


To Prepare Third Layer:


One 14-oz. (398 mL) can crushed pineapple

1-1/2 c. (375 mL) heavy cream (“whipping” cream)

1-1/2 tbsp. (22 mL) icing sugar (“confectioners” sugar or “powdered” sugar)


Drain juice from pineapple through a fine sieve at least 30 min. Beat whipping cream with icing sugar (see Note). Spread over butter-egg mixture. Freeze a further 10 min. to firm before dotting with pineapple. Cover and refrigerate 24 hr. before serving. Serves 10-to-12.


Note: For assured success, stiffen and stabilize whipped cream!


Friday, April 18, 2014

Follow-up: Frankie Hits Pay Dirt

Knowing that Frankie doesn’t have a nickel to his name, a philanthropic reader has taken pity on his plight. In today’s recipe for Broken Glass Dessert, Frankie promised two major food manufacturers the widespread publicity and renown that only the Stainless Steel Kitchens of Nicole Parton’s Favorite Recipes can deliver - as long as those food giants sent him a heap of small, unmarked bills.

I’m embarrassed to say Frankie’s attempt at extortion succeeded. Thanks to an anonymous reader, he struck it rich this afternoon. Unfortunately, this disgusting maneuver has already gone to his head. 

Frankie immediately demanded a bigger tank, and said he’d pay for it. He promised to tip me “a fin” if I were a “good girl,” driving him to the fish store so he could choose his new home. He insisted we start feeding him a regular ration of advertised products with a banner proclaiming “Frankie’s Favorite Fare,” in case anyone considered kicking more cash his way. 
Ron and I are mortified. Frankie’s already started laundering the money, to familiarize himself with the term “filthy lucre.” Please, readers - no more! Frankie’s greed is our shame. 

Broken Glass Dessert

It’s not our role to promote commercial products in the Stainless Steel Kitchens of Nicole Parton’s Favorite Recipes - unless, of course, we stand to make big bucks from the mention. The recipe below is Frankie’s favorite make-ahead dessert. 


This recipe uses a widely known commercial product that we will not name unless the manufacturers of Jell-O send Frankie $50,000 in small, unmarked bills. If large bills are the only available option, Frankie will launder them in his little tank. 


Advertising has its place, but pleading readers will meet a stone wall when they try to determine which brand of jelly powder I used in this recipe. My lips are sealed. 


Frankie suggests you resist the temptation to use actual “broken glass” in this dessert. Unless you’re one of his mobster pals, of course. In which case, you could sprinkle it on a rival’s cereal to become a Breakfast Cereal Killer.


Broken Glass Dessert:


To Prepare Graham Wafer Base:


1-1/2 c. graham wafer crumbs 

1/3 c. granulated sugar

1/3 c. butter or margarine, melted

1 tsp. cinnamon


Preheat oven to 350 deg. F. Combine well, pressing into a 9x13-in. pan. Bake 10 min. Chill to set. This step may be taken a day or two ahead.


To Prepare the Filling:


One 3-oz. (85 g) pkg pre-sweetened strawberry or raspberry-flavored jelly powder

One 3-oz. (85 g) pkg pre-sweetened  lime-flavored jelly powder

One 3-oz. (85 g) pkg pre-sweetened lemon-flavored jelly powder

4-1/2 c. (1.125 L) boiling water, divided into three parts

2-1/2 c. (625 mL) whipping cream, divided into three parts

1/2 c. (125 mL) icing sugar (“powdered” or “confectioners” sugar)

1 scant tbsp. (10.5 mL) unflavored gelatin

1/2 c. (125 mL) cold water

1/2 c. (125 mL) hot water

1/4 c. (60 mL) pineapple juice (see Further Note)


What to know before starting: 


This recipe requires one ungreased 13x9-in. (33x22 cm) pan and three ungreased 8x8-in. (20x20 cm) pans. Line square pans with parchment paper cut to fit. For each pan, cut a “lifter” or “sling” to fit under each parchment square. Each “lifter” should loosely overhang one set of opposing sides of each pan by about 7 in. (18 cm). The width of each “lifter” should be approximately 5 in. (12.5 cm).


In each of three medium bowls, dissolve each color/flavor of jelly powder in 1-1/2 c. (375 mL) boiling water, stirring until completely dissolved. Pour each jelly into 8x8-in. (20x20 cm) pan. Chill to set. Slice fully set jelly into 3/4-in. (20 cm) cubes while still in each pan. It doesn't matter if the squares aren't “perfect.” This step may be done a day or two ahead; cover and refrigerate.


On the day you serve this dessert: Whip cream, gradually adding sugar. Set aside. Soften gelatin in 1/2 c. cold water. Dissolve in 1/2 c. hot water. Stir in pineapple juice. When gelatin mixture cools, gently stir into whipped cream. Set aside.


Use two silicone spatulas or two rice paddles to extract cubed jellies from pans. Stirring carefully to randomize colors, gently fold in whipped cream mixture. Pour over base. Cover and chill. 


Thursday, April 17, 2014

Sesame Candy

A little of this sweet treat goes a long way, but it makes a pleasant change from the usual chocolate overload.  


Sesame Candy:


1 c. (250 mL) sesame seeds, toasted

3 tbsp. (45 mL) light brown sugar

3 tbsp. (45 mL) liquid honey


While sesame seeds toast, place a sheet of parchment paper (about the size of a baking sheet) on a heat-proof work surface. Have a second, similarly sized sheet at the ready. Set both sheets aside. In a small pan, combine sugar and honey. Stirring constantly, cook over low heat until thickened, about 5 min. Add sesame seeds, combining well. 


Immediately pour seed mixture onto first sheet of parchment, covering with second sheet. Using a rolling pin, roll mixture to about 1/4-in. thickness. Carefully peel paper from both sides of warm candy. Cut candy into rectangular shapes or squares. When candy is completely cool, store at room temperature in airtight container with layers separated by parchment.

Wednesday, April 16, 2014

Easter Marshmallow Treats

 Marshmallows! How can anyone resist? A recent visit to a chocolate shop prompted me to make this treat, but blee-ah! This is far, far too much sweetness for me! Try it with two marshmallows rather than three and it should be exactly right. 


A lollipop stick is a wiser, safer choice than the bamboo skewer I used. You’ll find lollipop sticks in craft and cooking stores.


You can also dip a single marshmallow in chocolate, and shake on the sprinkles rather than coat the chocolate with them. 


(My grandiose plan to serve Easter Marshmallow Treats is getting smaller all the time! I can’t imagine why that chocolate shop sold three decorated marshmallows on a stick, but when it comes to chocolate, some people lose all reason.) 


Marshmallows! How can anyone resist? I guess I can.


Note: If you like the idea of this treat, but not its overwhelming sweetness, try my chocolate-based Seed Candy Delights.


Melt milk chocolate in small batches.

Dip skewered marshmallows to coat ...


... on all sides.

Allow excess chocolate to drip off.

Coat warm chocolate in sprinkles of your choice.

Although this is a huge sugar hit, marshmallows can 
be eased from skewer and served individually.  

Tuesday, April 15, 2014

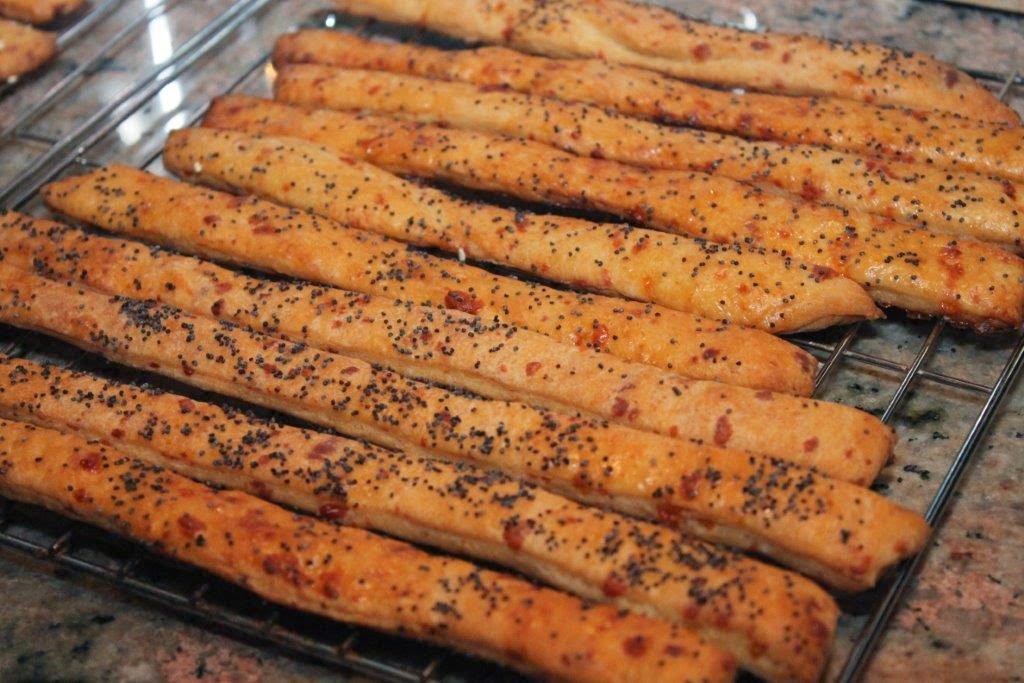
Cheddar-Poppy Seed Breadsticks

These excellent breadsticks are very easy to make!  


Cheddar-Poppy Seed Breadsticks:


1 c. (250 mL) hot milk (about 120 deg. F or 50 deg. C)

1/4 c. (60 mL) vegetable shortening, room temperature

1 tbsp. (15 mL) granulated sugar

1 tsp. (5 mL) salt (do not reduce)

2-1/2 c. (625 mL) all-purpose flour (see Note)

One 0.2-oz. (8 g) pkg active, granular quick-rise yeast (pkg equals 1 scant tbsp.)

1/2 c. (125 mL) grated extra-aged, sharp cheddar cheese

1 egg, beaten

2 tbsp. (30 mL) water

1-1/2 tbsp. (22 mL) poppy seeds or sesame seeds


Preheat oven to 300 deg. F. In a medium bowl, combine heated milk, shortening, sugar, and salt. Set bowl aside (Mixture will cool slightly as you combine dry ingredients; most of shortening will remain unmelted). In a large bowl, combine flour, yeast, and cheddar. Add milk mixture all at once, stirring with hands until well combined. 


Knead 2-to-3 min. in lightly floured work bowl until mixture forms a smooth, shiny, elastic ball. Allow dough to rest 10 min., lightly covered with a piece of parchment (Allow yourself to rest, too. Entré vous et moi, I knocked back a beer).


Slice dough into four equal portions with a lightly floured knife. Roll each portion out to roughly 9-x-9 in. Slice each portion into 9 equal pieces (see Obsessive-Compulsive Note). Leave them flat or give them a little roll or twist. Transfer to parchment-lined baking sheets (see “Wow, You’re Smart!” Note).


In a small bowl, whisk together egg and water. Using a pastry brush, dab each breadstick lightly and quickly with egg mixture. Using a shaker bottle, sprinkle with poppy or sesame seeds. Lightly cover unbaked breadsticks with parchment paper. Allow to rest 30 min. Bake 40 min. or until golden. Immediately transfer to wire racks so sticks will not soften. Makes approximately 3 dozen. 


Note: I use unbleached flour because I prefer its taste for bread-making, but bleached flour is also fine.


Obsessive-Compulsive Note: Ron poked his nose into the kitchen as I carefully measured and squared up the dough. “Too bad you don’t have a micrometer,” he said. “Then you could measure its thickness! You won’t worry so much about the length of those breadsticks after you’ve had a couple of bites!” 


This immediately made me laugh. All my careful measuring was ridiculous. Slice the dough approximately 1 in. (2.54 cm) wide and what you feel is just long enough, but don’t fuss. Once I stopped measuring, I realized how beautiful my “artisan-style” breadsticks really were. Perfection is not always a desired quality in baking. Celebrate that you made these breadsticks yourself! They shouldn’t look like they came from a factory.


“Wow, You’re Smart!” Note: The very best tool for picking up cut lengths of breadstick dough is a long, thin frosting spreader. Slip it barely under one end of the cut dough so you  can pick it up with 

P-h-h-h-t! 


your fingers and transfer it to a baking sheet without stretching it. The very best tool for flouring work surfaces and utensils is a small plastic squeeze bottle. One ph-h-h-t! and you’re finished. Now don’t go taking that the wrong way, Dollinks, or I’ll wash your mouths out with soap.


Knead dough in lightly floured bowl until smooth and elastic.


Cover lightly; let rise in a warm place, away from drafts.


Cut risen dough into four same-sized sections.

Measuring? Review Obsessive-Compulsive Note

Roll out and approximate, Dollinks!

Slice into more-or-less breadstick size.

Wash with diluted egg; sprinkle with seeds.

Baked and ready for taste-testing! Thumbs up!

Monday, April 14, 2014

Cranberry Orange Loaf

As you know, a deep freeze can be a source of many wonders and surprises. Until recently, our freezer held a bag of cranberries that was so big we charged it rent. 

An emotionally confused member of our Anonymous Taste Testing Panel tried to date it, but the relationship soon soured. Her loss was our gain, because the frozen berries went directly into this moist and delicious loaf - a great way to use them up. For best results, slice the loaf one day after baking it - if you’re strong enough to wait!

Cranberry Orange Loaf:

1 beaten egg, at room temperature
1/4 c. canola oil
Grated peel and juice of 1 orange
Skim milk, as needed
2 c. all-purpose flour
1-1/4 c. granulated sugar
1/4 tsp. salt
1-1/2 tsp. baking powder
1/2 tsp. baking soda
1/2 c. finely chopped pecans
1 c. fresh or frozen whole cranberries (do not thaw)

Preheat oven to 350 deg. F. In a medium bowl, combine egg, oil, and grated orange peel. Set aside. Add juice to measuring cup, topping with milk until level of liquid reaches a scant 1 c. Whisk into egg mixture. Set aside. 

In a large bowl, thoroughly combine flour, sugar, salt, baking powder, baking soda, and pecans. Add whole cranberries, stirring just until evenly distributed. Make a “well” in the center of the dry ingredients. Add liquid ingredients all at once, combining just until dry ingredients are moist. Do not over-mix.

Spoon batter into lightly greased and floured 9 x 5 in. loaf pan. Bake 55-to-60 min., or until skewer inserted at center of loaf comes out clean. Cool loaf in pan on wire rack 10 min. Loosen edges with knife and turn from pan to continue cooling. When fully cooled, store in airtight container.

Note: For muffins, spoon into standard muffin cups lined with ungreased muffin papers. Bake 25-to-30 min., or until a toothpick poked into the centre comes out clear. Yields 1 dozen.

Remove zest from an orange. Juice it, baby!


Measure juice, topping with skim milk to make 1 scant cup.


Add frozen or fresh cranberries to flour mixture. 


Flouring fruit prevents it from sinking to bottom of loaf.

Add combined liquid ingredients: Don’t over-mix.

Your finished loaf: Great for breakfast or afternoon tea!

Or ... To make these as muffins:


Serve warm or cool on wire rack before freezing.

For a decorative touch, dust and serve with sieved icing sugar.

Sunday, April 13, 2014

Sex in a Pan

This is easy to make and flat-out delicious! Repeat after me: This is not junk food! Not junk food! Not junk food! It is food you can take to the gym. Yeah, that’s what it is ... Food you can take to the gym

As for the title of this recipe ... Let’s just say it tastes the way it sounds.

Sex in a Pan:

This recipe requires extra chilling 

To Prepare the Base: 

1/2 c. (125 mL) butter or margarine, chilled 
1 c. (250 mL) all-purpose flour 
1/4 c. (60 mL) granulated sugar 

Preheat oven to 325 deg. F. Using a pastry blender, cut butter or margarine into combined flour and sugar. Mixture will resemble fine crumbs. Press into 10-in. (25-cm.) circular springform pan. Bake 25 min. Set aside to cool. 

To Prepare First Layer: 

Two 8-oz. (250 g each) pkg cream cheese, room temperature (see Cream Cheese Note)
1/2 c. icing sugar (“confectioners” sugar or “powdered” sugar) 
One 16-oz. (500 g) pkg sweetened topping such as “Cool Whip” (do not use real whipped cream for this layer) 

Beat cream cheese and icing sugar together until smooth. Stir in imitation whipped-cream topping. Spread over base. Chill. 

Cream Cheese Note: Do not use the softer “whipped” variety of cream cheese.

To Prepare Second Layer: 

3 c. (750 mL) milk 
One 5.9-oz. (167 g) pkg chocolate instant pudding mix (6 serving size) 
One 5.1-oz. (144 g) pkg vanilla instant pudding mix (6 serving size) 

Pour milk into large mixing bowl. Add pudding mixes. Beat 2 min. or until well blended. Let sit 2 or 3 min. Spread over First Layer, smoothing with a spatula. Chill.

To Prepare Third Layer: 

1 c. (250 mL) heavy cream (whipping cream), whipped (see Whipped Cream Note
12 chocolate wafers, finely crushed (about 3 tbsp. or 45 mL) or chocolate shavings. Substitute chocolate shavings, if you prefer.

Spread whipped cream over Second Layer, smoothing with a spatula. Sprinkle evenly with chocolate wafer crumbs or chocolate shavings. Cover lightly with waxed paper. Chill at least 2 hr. or until completely set. Serves 16. 

Whipped Cream Note: For assured success, see How to Stiffen and Stabilize Whipped Cream


Saturday, April 12, 2014

Cucumber and Pepper Thai Salad

Spring in the Northern Hemisphere and Fall in the Southern Hemisphere generally mean warm weather (One of the few exceptions is Melbourne, in which almost any weather system can happen almost any day. But that’s the cross Melbournians must bear for living in one of the world’s most beautiful cities). Warm weather signals a welcome return to salads: As a refreshing compliment to seafood and grilled meats, this Asian-inspired salad fills the bill! 

Cucumber and Pepper Thai Salad:

This recipe requires extra time 
for marination 

To Prepare the Salad: 

2 long English cucumbers, unpeeled
1 each orange, red, and yellow bell pepper (“capsicum”)
2 jalapeño peppers

To Prepare the Dressing:

1 tbsp. (15 mL) sesame oil
3 tbsp. (45 mL) rice wine vinegar
Juice of 1 lime
2 tsp. (10 mL) granulated sugar
1/4 tsp. (1.25 mL) salt
2-1/2 tbsp. fresh mint, chopped
3 tbsp. (45 mL) fresh basil, chopped
1/4 tsp. (1.25 mL) dried chili flakes

Slice cucumbers into paper-thin rounds. Seed bell peppers, slicing into julienne strips and halving each strip crosswise. Seed jalape
ño peppers, chopping finely. Combine cucumbers and peppers in large bowl. Combine remaining ingredients in small bowl. Pour over salad, tossing well. Refrigerate 1 hr. before serving. Serves 8-to-10.


Slice cucumber paper-thin.

Prepare orange bell peppers ...

And red ones ... And yellow ...

Add a little green pepper for extra color!


Two jalapeño peppers is plenty!

Seed and chop only what you need. 

Chop-chop-chop!

Add mint ...

Chop both fine.

Squeeze a fresh lime for the dressing. Combine 
dressing ingredients in small bowl ...  

Pour over salad. Toss. Marinate. Serve!

Tuesday, April 8, 2014

Zucchini Frittata

This makes a quick and simple brunch! It’s also a light but satisfying dinner when lunch is larger than usual.

Zucchini Frittata:

1-1/2 c. (375 mL) unpeeled zucchini, sliced into 1/2-in. (1.2 cm) rounds
1/3 c. (80 mL) finely chopped onion, minced
1 tbsp. (15 mL) butter or margarine
1 tsp. (5 mL) olive or canola oil
4 eggs, well beaten
1-to-2 tbsp. (15-to-30 mL) milk
1 tbsp. (15 mL) finely chopped parsley
1 tsp. (5 mL) dried or 1/2 tsp. (2.5 mL) fresh rosemary
1/2 tsp. (2.5 mL) salt
1/4 tsp. (1.2 mL) coarsely ground black pepper
1/4 c. (60 mL) shredded white cheese mixture including such cheeses as Mozzarella, Parmesan, Emmental, and Provolone

Preheat oven to 325 deg. F. In medium skillet over medium-high heat, gently sauté zucchini and onion in butter and oil, turning once, 5 min. or until tender. Transfer to lightly greased 1 qt. (1 L) oven-proof casserole (see Note).

In small bowl, combine eggs, milk, parsley, rosemary, salt, and pepper.  Pour over zucchini and onion. Bake, uncovered, 18-to-20 min. until mixture is set but center remains soft. Remove from oven, sprinkling top of frittata with cheese. Return frittata to oven, broiling 3 min. or until cheese melts and top is golden. Serves 2. 

Note: I used a 3 c. (750 mL) casserole. Because our household has grown smaller over the years, many of my casseroles have, too. I also use my oven less and my toaster oven more.

Another Note: For more zucchini recipes, see One Click: Zucchini.

Take one small zucchini ...

And a little onion ...

And a cappuccino ... Wha-??? No, no! Omit that!

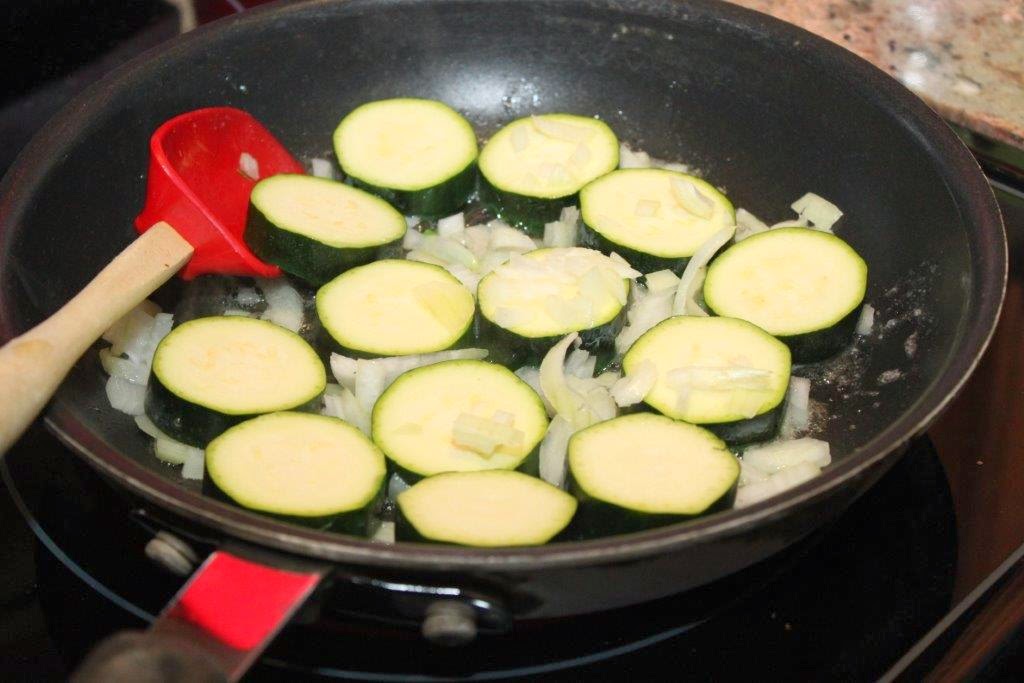
Gently sauté zucchini and onion.

Whisk a few eggs with milk and herbs ...

And bathe the cooked zucchini and onion in this mixture.

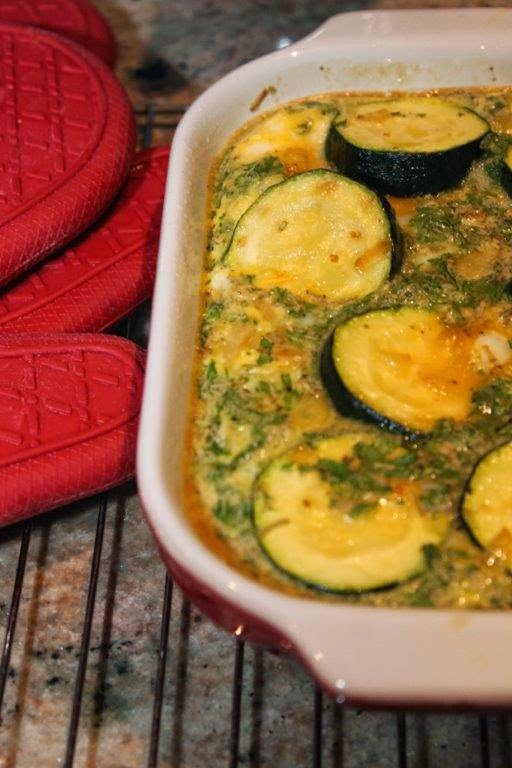
Bake until almost - but not quite - done.

Top with cheese! Broil! Eat! Easy, wot?