Pinterested?

Tuesday, March 20, 2012

Giuseppe’s (Joe’s) Caesar Salad

This excellent dressing is a little different from the one I gave you a few days ago (see Rosalie’s Caesar Salad and Nicole’s Special Croutons posted Mar. 4, 2012). My friend Joe is known for his outstanding Caesar Salad. This is his exclusive recipe - one of the finest salads I’ve ever tasted.
Giuseppe’s (Joes) Caesar Salad:
6 tbsp. canola oil
2 tbsp. white wine vinegar
1 tbsp. olive oil
1 tbsp. fresh lemon juice
1 tsp. salt (do not reduce)
1 coddled egg (see Note)
2 tsp. fresh finely chopped garlic
⅛ tsp. each granulated sugar, coarsely ground pepper, dry mustard, tarragon
3 drops hot pepper sauce such as Tabasco
4 drops Worcestershire sauce
1 tsp. fresh parsley
2 heads crisp Romaine lettuce, washed, dried, and torn (not sliced)
1 whole clove garlic, for rubbing inside of wooden serving bowl
1 c. Nicole’s Special Croutons (see note above this recipe)
¾ c. freshly grated Parmesan cheese
½ lb. crisp, crumbled bacon or 1 dozen broken anchovies (optional)
Combine all ingredients except lettuce, croutons, cheese, and bacon or anchovies in blender or small bowl. Blend on low speed or whisk to combine. Toss together with Romaine in large work bowl. Peel and rub garlic clove with vigor inside wooden serving bowl. Discard clove. Transfer tossed, dressed greens to serving bowl. Top with croutons, cheese, and bacon or broken anchovies. Serve immediately. Serves 6-to-8.

Note: To coddle an egg in the shell, place it in a small bowl and pour water just below the boiling point around it, completely submerging it for 1 min. Remove from water bath, quickly chilling under cold, running water until it is cool enough to handle before adding to dressing. Use only the freshest eggs to make this salad.


Place crisp, torn lettuce leaves into a large bowl

Squeeze one fresh lemon

Add lemon juice to other ingredients in blender or bowl

Add coddled egg

Combine on low speed of blender

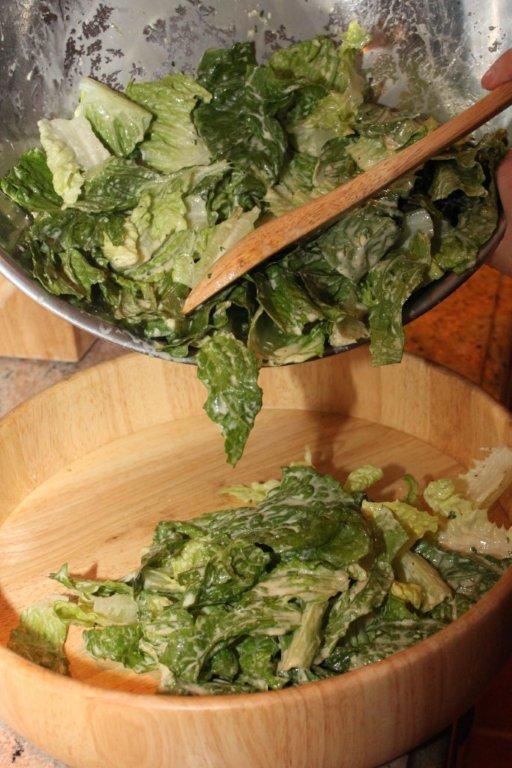
Toss in original work bowl before
transferring to salad bowl

Immediately before serving, add croutons, freshly
grated Parmesan, and bacon or anchovies

Light a candle, have a glass of wine and a baguette,
and enjoy a wonderfully lazy meal!

Monday, March 19, 2012

Mushroom and Snow Pea Salad

When “same-old, same-old” fails to excite, try something new! Let this interesting salad fill the bill. 

Mushroom and Snow Pea Salad:
This recipe requires extra time 
for marination

½ lb. mushrooms
2 tbsp. dairy sour cream
2 tbsp. olive oil
2 tbsp. white wine vinegar
¼ tsp. tarragon
¼ tsp. dried dill weed
1 tsp. capers, drained
1 small garlic clove
⅛ tsp. cayenne pepper
Dash of salt
½ c. (about 4 oz.) fresh snow peas 
1 tbsp. diced red bell pepper
1 tbsp. finely chopped green onion (“spring onion”)
4 butter lettuce leaves (also known as Boston Bibb lettuce), as garnish
1 hard-cooked egg, grated as garnish
Finely chopped fresh parsley, as garnish
Clean and slice mushrooms. To prepare the dressing, combine sour cream, olive oil, vinegar, tarragon, dill weed, and capers. Season to tste and toss with mushrooms. Chill at least 2 hr. Blanch (see Note) snow peas in boiling water for 30 sec. Chill under cold, running water. Drain, blot dry, and snip into ¾-in. pieces. Toss snow peas, diced red pepper, and green onion with marinated mushrooms. Heap onto lettuce leaves on individual serving plates (chill salad plates in the freezer for best presentation). Garnish with grated egg and parsley. Serves 4.

Note“Blanching” fruits and vegetables is a process of dipping them into boiling water for a pre-determined time before chilling them in an ice water bath. Blanching sets the colour of green vegetables and loosens the skins of foods such as silver-skin onions and peaches.

Combine vinaigrette ingredients; toss with sliced mushrooms
Blanch snow peas in boiling water for 30 sec.

Chill at once

Dice red pepper and green onion ...
Add to marinated mushrooms

Heap tossed mushroom mixture onto lettuce leaves

How to Blanch Corn and Other Foods

I’ve found that freezing corn on the cob is the best way to preserve it - just think of the pleasure of having “fresh” corn on the cob in winter! Depending whether your shucked cobs are large or small, you’ll need to blanch cobbed corn for 6-to-10 min. (Smaller fruits and vegetables require substantially less blanching time, with asparagus spears needing only 30 seconds).


Why blanch produce bound for the freezer? Blanching preserves the flavor of food by destroying the enzymes that can eventually erode its nutritional quality and taste. For more about blanching foods, see http://en.wikipedia.org/wiki/Blanching_(cooking)


To blanch corn, fill a very large pot with unsalted water; I recommend a canner because it holds a substantial amount of water. The water will cool down after you add the corn. Because a canner holds such a large amount of boiling water, the water will cool less, returning to a boil very quickly after you add the second and subsequent batches of corn. Once the water’s at a rolling boil, plunge in corn cobs that have been stripped of their husks. 

Remove corn with tongs, plunging cobs into a sink or other container filled with cold, running water and plenty of ice until they’re thoroughly chilled, approximately 10 min. Blot cobs dry with paper toweling before packing them into heavy-duty zippered freezer bags with all or most of the air squeezed out. 


Alternately, use vacuum-sealed bags or wrap each cob in clear cello before bagging and freezing. If what you want is kernel corn, blanch, chill, and dry the whole cob before cutting the corn as kernels. Kernel corn needs less freezer space than corn on the cob - a definite plus! For a fabulous way to husk and cook corn cobs super fast, see the Index for How to Shuck and Cook Corn


Note: I’m going to assume you want to freeze many cobs of corn; if not, an ordinary large pot will do fine, but will restrict you to working with only a few cobs at a time. Smaller veggies and tree fruits such as peaches or apricots need less blanching time; remove them with a slotted spoon or smaller tongs. Transferring peaches and apricots from boiling to icy water loosens their skin enough that you can rub it right off. 

Sunday, March 18, 2012

Whole Wheat Banana-Fig Muffins

Let’s be honest about this: “Healthy” muffins often taste like sawdust. These do not. Moist and delicious, these “feel good” muffins are also good for you! Ron was beside himself when I created these - and being “beside himself,” ate two portions! 
Whole Wheat Banana-Fig Muffins:
1-½ c. whole wheat flour
2 tsp. baking powder
½ tsp. baking soda
¼ tsp. salt
¼ tsp. cinnamon
¼ tsp. nutmeg
½ c. brown sugar, packed
3 large, ripe bananas
½ tsp. banana extract
1 egg
⅓ c. melted butter or margarine, cooled (see Note)
¾ c. coarsely chopped fresh figs, stems snipped, or plumped golden raisins (see Further Note)
Have all ingredients at room temperature. Fill medium muffin pans with 12 medium paper liners; spritz each liner with a quick oil spray. Preheat oven to 350 deg. F. Combine dry ingredients in a large bowl, making a depression or “well” at the centre. In a separate bowl, mash bananas, mixing well with extract, egg, and butter. Pour all at once into dry ingredients, mixing just until moistened. Quickly stir in figs. Spoon into ungreased paper-lined muffin cups, 2/3 full. Bake 20-to-25 min. Yields 1 dozen standard-sized muffins.
Note: To lower the fat content, substitute ⅓ c. applesauce for the butter in this recipe.
Further Note: See Index for How to Plump Dried Fruits. Drain and use as recipe directs.

Over-ripe bananas work well in this recipe

Combine dry ingredients, making a "well" in the center

Prepare figs as recipe directs; set aside

Mash banana before adding butter and egg
Add liquid ingredients all at once

Prepare to fill greased paper-filled muffin cups 2/3 full

These muffins say "MORE"!

Saturday, March 17, 2012

Cream Puffs

Happy St. Patrick’s Day! These Cream Puffs are a simple way to celebrate! My beloved aunt gave me this recipe when I was 12. I’ve been making these ever since: They’re always a big hit!


Cream Puffs:
1 c. (250 mL) water
½ c. (125 mL) butter or margarine
1 c. (250 mL) sifted all-purpose flour
¼ tsp. (1.2 mL) salt
4 eggs
2 tbsp. (30 mL) icing sugar
1 tbsp. (15 mL) whipping cream stabilizer (optional; see Note)
1 c. (250 mL) whipping cream
Have eggs at room temperature. Bring water and butter to a rolling boil in a large saucepan over high heat. Sift flour and salt together and add to saucepan, stirring vigorously until dough pulls into a ball. Remove from heat and cool slightly. Add eggs one at a time, beating well after each addition. Drop by heaping dessert spoonfuls onto a baking sheet lined with parchment paper, aiming for 10 large or 24 small portions of dough.
Preheat oven to 450 deg. F. Bake 15 min. Lower heat to 325 deg. F. and bake 25 min. longer. Turn off oven and remove puffs, splitting each horizontally to remove the top third. Return opened puffs to the still-warm oven and allow to dry 20-to-25 min.
When puffs are fully cool, add icing sugar and stabilizer to cream. Whip until soft peaks form, piping or spooning cream into base of puffs. Top with remaining third of cream puff. Drizzle with Fabulous Chocolate Glaze. For a lower calorie count, skip the glaze and sift icing sugar over tops. 
Note: With the addition of a whipping cream stabilizer, these Cream Puffs may be filled and refrigerated up to 12 hours. You can easily make your own stabilizer: See How to Stiffen and Stabilize Whipped Cream.

Melt butter in water over medium-high heat.

When water and butter start to boil, work fast!

Add flour and salt all at once, stirring quickly.

Add eggs one at a time, beating after each addition.

Dough will pull away from pan sides to form a ball.

Spoon dough onto parchment-lined baking sheet.

Dough puffs up in hot oven.

Cut top third from fully cooled puffs; fill with cream.

Drizzle chocolate glaze over filled puffs.

Present Cream Puffs with panache!

Friday, March 16, 2012

Top o’ the Mornin’ Marmalade Muffins

These sweet, finely textured muffins are a bright, cheery way to start the day! Because they’re so moist, they keep extremely well. To me, they’re a splendid way to enjoy a St. Patrick’s Day breakfast or tea.
Top o’ the Mornin’ Marmalade Muffins:
To Prepare the Muffins:
1 c. butter or margarine, softened
1-½ c. granulated sugar
4 eggs
Grated rind of 1 large lemon
1 c. orange marmalade
1 c. plain, natural yogurt
4 c. all-purpose flour
4 tsp. baking powder
2 tsp. baking soda
1-½ c. buttermilk
Have all ingredients at room temperature. Fill medium muffin pans with 12 medium paper liners; spritz each liner with a quick oil spray. Preheat oven to 375 deg. F. Cream butter and sugar together 5 min., adding sugar gradually until no grainy texture remains. Add eggs one at a time, beating well after each addition (see Note). Stir in lemon rind, marmalade, and yogurt. In a separate bowl, stir together flour, baking powder, and baking soda. Gradually add to creamed mixture, beating at medium speed. Stir in buttermilk, mixing just until moistened. 
Spoon into ungreased paper liners in muffin pans, filling 2/3 full. Bake 20 min., just until toothpick poked into the centre of a test muffin comes out clean. Remove from oven. Using a skewer, poke a few holes into each hot muffin, pouring in glaze. Yields 18-to-20 standard-sized muffins.
Note: Always add eggs one at a time when you bake. This ensures their even dispersion with the creamed butter in your recipe, giving your baked goods an excellent texture. 
To Prepare the Glaze:
3 tbsp. lemon juice
3 tbsp. orange juice
½ c. granulated sugar
Combine juices and sugar in a microwave-safe container, heating about 30 sec., or until sugar dissolves. Stir and pour over hot, baked muffins. Let stand 10 min. before removing muffins from pans. Makes 18.

A fine Microplane grater produces maximum lemon zest 

Add zest to muffin batter

In goes the secret ingredient ... marmalade! 

Decorate with a "bit o' the green" for St. Patrick's Day morning

Thursday, March 15, 2012

Faerie Toadstools

This imaginative recipe idea sprang from failure. When I recently hosted a St. Patrick’s Day-themed party, I thought I’d offer a small platter of chocolate-dipped strawberries. I prefer to keep life simple, and didn’t want to spend hours obsessing over doing something fancy. I’ll leave that to the pros - too much effort for me! 
If you plan to dip strawberries in chocolate, it’s important to ensure they’re not wet, lest the chocolate seize up. I carefully rinsed and dried about 18 fresh strawberries for this recipe, skewered them on fondue forks, and dipped them into melted white chocolate. To my great disappointment, they looked … awful! 
I hoped to save them with a drizzle of dark chocolate, but the cupboard was bare - I had none!
With St. Patrick’s Day in mind, I grabbed a shaker of crystalized green sugar, sprinkling it over the berries. This didn’t look so hot, either. Standing each berry straight up on its base, I let the chocolate harden, and wondered what to do. 
Clustered on a two-tiered tray, the dipped, sugared berries looked a little better, especially placed on small green candy papers. Suddenly … Eureka! The crystalized green sugar became “fairy dust,” and the strawberries, “Faerie Toadstools.” That was all I needed to make up a quick story on the spot. Fairies and Leprechauns are very “Irish,” so the story I told the children at the party was this: “Fairies live at the bottom of every garden. When they need somewhere to sit, they perch on Faerie Toadstools  exactly like these, covered in fairy dust! When you eat one of these toadstools, make a wish and your wish will come true!”
My wish was that the kids would eat every single one of those ghastly looking berries. And yes … my wish came true! 

Dip fresh strawberries into melted white chocolate

Sprinkle with crystallized green sugar

Add plenty of blarney and bluff your way through!