Pinterested?

Saturday, July 9, 2022

Prawn and Asparagus Salad

A great hit at dinner parties, this simple salad is easy on calories while rich in taste and appearance. Large, frozen prawns are far cheaper than fresh ones, so the frozen ones are  what I use, thawing them overnight in the fridge. 


If your grocer doesn’t stock Bocconcini cheese balls (aka “pearls”), use a small scoop to carve them from a large ball of soft Mozzarella (“Bocconcini”). I use seven or eight prawns per main dish serving (Even 10! Live on the edge, Nicole!). 


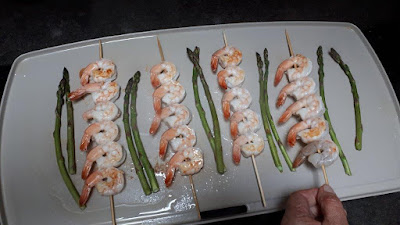
Only the prawns need last-minute preparation: Cook them on lightly greased skewers on high heat: I use a griddle rather than fussing with a skillet.


 Griddle-sear prawns and asparagus.

Skewering prawns makes their placement on the salad much quicker. I steam the asparagus or - if the stalks are especially thin - sear them beside the prawns. Make things easy on yourself with a high-quality prepared salad mix (rather than ripping and gripping and snarling and swearing because you
’re running out of time).


Adjust the quantities of the salad and the dressing recipe as you prefer. Served on small plates,  and in smaller quantities, this also makes a terrific appetizer. 
Once you’ve made this dish, you’ll want to serve it over and over again!


Prawn and Asparagus Salad:

Over individual plates of mixed greens, arrange: 

Prawns, pan-seared on the stove just until they turn pink

Asparagus, cooked briefly, chilled on and under ice, and patted dry with a paper towel (see Asparagus Notes)

Cherry tomatoes, halved

Bocconcini pearls

Drizzle with light oil-based dressing of your choice (see Dressing Note).

Asparagus Note: Thin asparagus boiled in a skillet need about one minute; thicker asparagus need slightly more, but be careful not to cook them through. These should be al dente (slightly crunchy-crisp).


Further Asparagus Note: Eating unsauced, firm asparagus with your fingers is considered polite, one stalk at a time.


Dressing Note: Salad dressings flummox me. Never quite sure which to choose, I generally ask husband Ron to provide something. So this simple something was it! Adjust the quantities as you need to; this makes enough for two servings.


Prawn and Asparagus Salad Dressing:


2 tbsp. (30 mL) soy sauce

1 tbsp. (15 mL) granulated sugar

2 tbsp. (30 mL) rice vinegar

1/2 tsp. (2.5 mL) garlic powder


Shake ingredients together in covered jar until well combined. Let sit in fridge at least 30 min. to allow flavors to blend. Drizzle over prepared salad just before serving.

Friday, July 8, 2022

Sour Cream Cucumber Salad

There are several versions of this excellent salad. I like mine, best!


This recipe  requires extra time 

for marination


Sour Cream Cucumber Salad:

2 large long “English” (seedless) cucumbers, skin on

1 small white onion, finely minced

1/2 c.(125 mL) sour cream

1/4 c. (60 mL) mayonnaise

2 tsp. (10 mL) white wine vinegar

2 tsp. (10 mL) fresh lemon juice 

2 tsp. (10 mL) granulated sugar

1 tsp. (5 mL) dried dill weed

1 tsp. (5 mL) salt

1/4 tsp. (1.25 ml) coarsely ground black pepper


Thinly slice cucumber. Place one layer of cucumber slices into ceramic or glass pie plate. Sprinkle with salt. Repeat layering and salting until all cucumber slices have been used. Place cello wrap directly over cucumbers. Cover with a second, smaller pie pan, adding pie weights, marbles, or water to weight the pan down. Place in refrigerator for several hours. Remove weight and drain liquid from cucumbers, rinsing away excess salt with cold water. Drain well. 


Add remaining ingredients to small bowl, until thoroughly mixed. Pour mixture over chilled, drained cukes, combining gently. Cover and chill at least 1 hr., allowing flavors to blend. Just before serving, lightly toss again. Serves 4. 

Thursday, July 7, 2022

Pork Stir-Fry à la Nicole

Whaddya do with a hunka-hunka ground pork? I had 1-3/4 lb. (806 g) of it taking up space in the freezer. Combining it with an equal amount of ground beef would have been the usual thing for making meat loaf, meat balls, or burger patties, but with no ground beef on hand, I flapped around, wringing my hands, moaning: “What can I do-o-o …?”


Go online.

Grateful to have found this largesse in the freezer, I was also grateful to www.frugalnutrition.com for the clever idea of turning such a large amount of ground pork into a stir-fry. If truth be told, I actually had twice the ground pork this recipe calls for - something I discovered too late to do anything about it. 


Doubling the pork didn’t seem to matter because everything turned out fine. As cooks often do, I modified the recipe by using whatever I had lurking in the fridge. This was the result.


Pork Stir-Fry à la Nicole:


1 c. (250 ml) uncooked brown rice

1-to-2 tbsp. (15-to-30 mL) canola oil

3/4 lb. (340 g) ground pork or other ground meat (see Meat Note)

1/2 medium white onion, peeled, sliced into wedges

1-1-2 c. (375 mL) sliced mushrooms (see Mushroom Note)

1 c. (250 mL) carrots, rinsed, peeled, and cut into (thick-ish) match stick size (see Shocking Carrot Note)

4 c. (1 L, give or take), angle-sliced celery with leaves, or other greens including (but not limited to) bokchoy, kale, trimmed asparagus stalks, parsley, etc. 

3 or 4 tbsp. (45-to-60 mL) fresh ginger, peeled and minced fine

2 or 3 cloves fresh garlic, peeled and minced fine

1/4 c. (60 mL) soy sauce, divided

3 tbsp. (45 mL) rice wine vinegar

1 tsp. (5 mL) chili flakes

Sesame seeds, toasted, as garnish

3 or 4 green onions, angle-sliced, as garnish


Have all ingredients arrayed and prepared in advance. Ensure Angle-slice celery slightly thick, rather than thin.


Set well-rinsed rice over stovetop or in rice cooker. If you’re unfamiliar with cooking brown rice, see my post for How to Cook Rice (https://nicoleparton.blogspot.com/2012/01/how-to-cook-rice.html) and specifically the section on How to Cook Long-Grain Brown Rice. The amount of brown rice in this recipe will require 1-1/2 (375 mL)-to-2 c. (500 mL) water or chicken stock. 


To wok set over high heat, add canola oil and ground meat, breaking up meat until browned. Remove meat from wok; set aside. Pour off all but 1 tbsp. (15 mL) of oil.


Reduce heat to medium-high. Add onions and mushrooms, sauteéing onions are slightly softened. Add mushrooms, continuing to toss until mushrooms are heated through. Add carrots and celery stalks, tossing a further 3 or 4 min. Stir in ginger, garlic, half soy sauce, rice wine vinegar, and chili flakes. 


Reducing heat to medium, cover wok, cooking 5 min., or until carrots and celery are partially cooked, but still crunchy. Remove wok cover, sprinkling remaining soy sauce over dish. Garnish with sesame seeds and green onion. Serves 6.


Meat Note: Dork that I am, I used 1-3/4 lb. (806 g). Over a couple of days, we gobbled up every bit of this very “meaty” stir-fry, not realizing the difference.


Mushroom Note: Gather ’round! Let me tell you how I prepare mushrooms to save time when I need it. Buying mid-sized cremini mushrooms in quantity - this works with most types of mushroom - I dust off the dirt, cutting them into a uniform size with an egg slicer (Younger people may prefer a knife, but I’m old and decrepit and find an egg slicer easier). 


In large skillet, fry mushrooms in butter or margarine. Transfer cooled mushrooms and melted butter or margarine to small freezer-safe containers holding 1/2 c. (125 mL) each. Label and freeze for conveniently quick use in recipes such as this.


And now a full-blown rant!


Shocking Carrot Note: Ignore what’s below if you’re content with the way your carrots smell. Read it if you feel their smell has recently changed for the worse. This blog is read worldwide, so what I’m about to say may or may not apply to you.


I recently came across a couple of interesting questions to Google. The first question was written and answered in 2010: What are carrots supposed to smell like?


Here’s what https://seattlelocalfood.com/2010/11/07/carrots/ replied: 


“Perfect carrots smell like spring, like sweetness in the back of your throat, like everything a carrot seed dreams of growing up to be. Smell your carrots, folks. If they smell good, they'll taste good.”


The second question was written and answered in June, 2022: Why do my carrots smell weird?


Among the several reasons: Your smelly carrots may have been treated with essential oils. hat, my friends, strikes me as unacceptable.


https://www.sciencedirect.com/science/article/abs/pii/S2214799322000236


The journal Current Opinion in Food Science features a study headed Use of essential oils against food-borne spoilage yeasts: Advantages and drawbacks. The paper suggests one reason why not only carrots, but other foods, may smell “different.” 


“Recent scientific studies have demonstrated the effective application of essential oils (EOs) as natural preservatives for controlling spoilage yeasts in foods as: fruit and fruit juices, raw vegetables, cereal-based products, meat-based products, and dairy products. 

“Notwithstanding, the main limitation in using EOs, especially when applied at high concentration, is related to their strong impact on the sensory traits of the treated foods. Hence, to preserve food quality and to assure antifungal activity, the optimal formulation, concentration, and combination of each EO should be defined for each specific food matrix …”

The article summarizes EOs as “natural aromatic volatile compounds extracted from different parts of plants … including compounds containing nitrogen and sulfur with unpleasant odors (e.g. amines, thiols, etc.) …

“Because of the chemical nature of the active substances contained in EOs, great attention to their proper selection for food preservation must be paid. Indeed, not only the aroma and taste may be altered by the use of EOs as protective substances against spoilage yeasts, but also the color, texture, general visual perception as well as tactile and mouth feel during consumption. It is noteworthy that aroma and associated taste have a crucial impact on consumer acceptability of food.”

Conclusion: I first noticed an offensive smell in packaged, peeled baby carrots, several years ago. I stopped buying them. Unless your grocer has an advanced degree in chemistry, s/he probably won’t care. If your carrots smell foul, switch to organic.  

If your local newspaper features a consumer columnist, or your radio or TV station has a consumer broadcaster, draw this to his or her attention. Sure, it’s nerdy science stuff, but essential oils and food don’t belong together. 

Who says? The US Food and Drug Administration, that’s who. Of course, it’s a question of degree and quantity, but when food starts to stink … Too much is too much.

Monday, June 20, 2022

Hot Potato Salad

This dish is the ideal accompaniment to an Austrian-themed Evening in Vienna! 

Hot Potato Salad:

4 c. (1 L) potatoes, peeled, cooked, and chunked

6 slices bacon, sliced into 1-in. (2.54 cm) pieces

1/2 c. (125 mL) onion, cut in medium dice

2 tbsp. (30 mL) flour

1/2 sp. (2.5 mL) mustard powder

1 tbsp. (15 mL) granulated sugar

1-1/2 tsp. (7.5 mL) salt

1/2 c. (125 mL) white vinegar

1 tsp. (5 mL) celery seed

Parsley, as needed, chopped


Set cooked potatoes aside. In large skillet on medium heat, fry bacon until fat begins releasing. Add onions, stirring until transparent. In small bowl, combine flour, mustard, sugar, and salt. Stir into bacon and softened onions until well combined. 


Slowly add vinegar, stirring constantly until mixture is slightly thickened. Add potatoes and celery seed, tossing lightly. Sprinkle with chopped parsley; serve immediately.


Tuesday, May 24, 2022

Pineapple Cream Cheese Frosting

This frosting is terrific over Pineapple Coconut Muffins - or spread over anything else you want - including your tongue.

 Pineapple Cream Cheese Frosting:

One 8 oz. (250 g) pkg. brick-style cream cheese, softened

10 mashed pineapple chunks, well drained 

2 tsp. (10 mL) pineapple juice

3 c. (625 mL) sifted icing sugar (“confectioners” or “powdered” sugar)


Beat cream cheese with pineapple chunks and juice until well blended. Chunked pineapple will break into small pieces that flavor the frosting. Gradually add icing sugar until frosting is smooth and creamy. 

Pineapple Coconut Muffins

How do you spell “yummy”? Because that’s what these muffins are: Delicious and outstanding! Fast and easy to prepare, they  make an excellent gift for a friend - or a treat for you!


Pineapple Coconut Muffins


1/2 c. (125 mL) butter or margarine, softened

1 c. (250 mL) granulated sugar

2 large eggs, room temperature

1/2 c. (125 mL) coconut milk (see Note)

1 tsp. (5 mL) coconut extract (optional)

1-1/4 c. (310 mL) sweetened, flaked coconut, divided

1-1/4 c. (310 mL) all-purpose flour

2-1/2 tsp. (12.5 mL) baking powder

1/2 tsp. (2.5 mL) salt

1 c. (250 mL) canned pineapple chunks, drained


Preheat oven to 375 deg. F. Insert 12 paper liners into standard-sized muffin pan. Using electric mixer in large bowl, beat softened butter, gradually adding sugar until “fluffy,” about 5 min. 


Add eggs, one at a one, beating until well combined. Beating on low speed, add coconut milk and 1 c. (250 mL) coconut. In small bowl, combine flour, baking powder, and salt. Gradually add to batter while continuing to beat on low. Slice each chunk of pineapple in half, hand-stirring into batter. Divide batter evenly into muffin cups, topping with remaining coconut.


Bake 20 min. or until golden and toothpick inserted in center of muffin comes out clean. (No worries! Coconut topping will not - I repeat, not!) burn. Frosting is optional. Cool in pan 5 min. before transferring to wire rack to cool. Makes 12-to-13 (see Tip).


Note: I use canned coconut milk, stored at room temperature. Open both ends of the can, pouring into medium mixing bowl, gently stirring to combine watery milk and fat. Store remainder in fridge.


Tip: Muffin cups should be 2/3 full. Don’t overfill. If you use metal measuring cups, add remaining batter to paper-lined 1 c. (250 mL) cup, baked alongside muffin pan.


Note: If you prefer, leave off the coconut and top with Pineapple Cream Cheese Frosting. 

Wednesday, May 18, 2022

Succotash


You’ve heard of it. And now you have the recipe! 

Succotash is a nutritious, colorful, meatless dish - especially in this difficult time of sky-high food prices and ever-more scarcity. A little goes a long way with economical Succotash - especially with a chunk of homemade bread. 

Hands up, those of you who remember a cartooned Sylvester the car complaining about giving up his regular diet of birds and living on (you guessed it) Thuffrin’ Thuccotash! If you don’t have this or that in the kitchen cupboard, try that or this. So here’s your starting point. Whether you add your own favorites or keep it as is, this recipe is infinitely flexible and enjoyable.


Succotash:

1 tbsp. (15 mL) olive oil
1 tbsp. (15 mL) butter or margarine

2 garlic cloves, peeled and crushed

1/2 c. (125 mL) each red and green bell peppers, seeded and diced into 1/2 in. (1.3 cm) pieces

1 celery stalk, sliced lengthwise into half or thirds and then into 2-in. (5 cm) pieces

3 green onions, sliced into 1/2 in. (1.3 cm) pieces

1 c. (250 mL) canned corn niblets, drained, or fresh, pre-cooked corn, sliced from the cob

1/2 c. (125 mL) canned pinto beans or black beans or red kidney beans, rinsed several times and drained well

Canned, sliced, drained jalapeño peppers (optional), to taste
1/2 tsp. (2.5 mL) cayenne powder, or to taste

Salt and pepper, to taste

Handful of fresh cherry tomatoes, sliced into thirds

1 tbsp. (15 mL) fresh lemon or lime juice

2 c. (500 mL) fresh cilantro, stemmed and coarsely chopped

Sour cream (optional)


Have all ingredients prepared and arrayed in advance. In large cast iron skillet on medium heat, combine oil, butter, garlic, bell peppers, celery, and green onion, stirring until slightly softened. Add corn and beans, combining well and heating through, about 5 min. 


Stir in jalapeños and seasonings, as desired (It’s these ingredients that give this dish its traditional “kick,” so consider reducing, rather than omitting them).


Toss in cherry tomatoes, stirring just until heated through, about a minute. Sprinkle with juice and toss with cilantro. Serve at once, directly from the skillet.


Note: While the prep time for this low-fat, high-fiber recipe is long, its cooking time is short. I sometimes prepare the ingredients in the morning, serving it as a salad with a light vinaigrette. If I’ve been a little too heavy-handed with the jalapeño peppers, sour cream cools it down nicely. As an outstanding dish for a dinner party, a buffet, or a family get-together, I serve it often. 


Tuesday, December 28, 2021

One Click: Pizza

You’re just One Click away from the perfect pizza - whether the complex pairings of seafood and seasonings in Ron’s Seafood Pesto Pizza or the couldn’t-be-simpler Easy Cheesy Pizza with its pourable crust of eggs and cheese. To kick this off, let’s start with two perfect crusts: 


• The Perfect Pizza Crust Version 1

• The Perfect Pizza Crust Version 2


Followed by some some great pizzas! 


• Ron’s Seafood Pesto Pizza

• René and Leslie’s Tomato Pizza

• New York-Style Pizza

• Turkey-Pineapple Pizza

• Pear ’n’ Prosciutto Pizza

• Easy Cheesy Pizza


Until we meet again ... Happy New Year, Dollinks! 

Monday, December 6, 2021

Linda’s Pork-Free Turkey Stuffing

My longtime friend Linda Walkem Hall is a remarkable cook. Many of her dishes originate with the organic vegetables and herbs she raises in her lakeside garden. Linda’s Pork-Free Turkey Stuffing is always popular. PS: (Stuffing prepared and served outside the bird is termed Dressing)  

Linda’s Pork-Free Turkey Stuffing:


Avocado oil (as needed for volume of onion and herbs used)

1 onion, coarsely diced

Sage, fresh or dried and plenty of it 

Rosemary (ditto) 

Oregano (also ditto) 

Coarse ground sea salt, to taste 

Coarsely ground pepper, to taste

Plain croutons (commercial or homemade), as needed


One day before roasting turkey, heat medium skillet with avocado oil. Add onion with sage, rosemary, and oregano (see Herb Note). Sautée lightly and season to taste. Transfer to covered container and refrigerate, allowing flavors blend overnight.  


(Linda buys her croutons; if you prefer homemade, reduce the seasoning for the herbs and prepare Nicole’s Special Croutons.


When ready to roast turkey, warm onion and herbs in skillet, tossing lightly with croutons. In Linda’s words: “Jam it into the turkey’s tummy” (the body cavity), roasting as recipe directs. 


Herb Note: The flavor of dried herbs is more concentrated than fresh. Use fewer dried herbs than fresh ones, proportionate to the other ingredients in this recipe. 


For more turkey recipes, see One Click: Turkey. 


Linda’s Pork-Free Turkey Stuffing
- Photo by Linda Walkem Hall

Saturday, December 4, 2021

Nicole’s Turkey Gravy

These instructions apply to turkey, poultry, and meats - but mostly to turkey!

Never wrestle with a heavy turkey; the turkey will always win. Invest in a good-quality lifter to transfer the turkey from pan to platter. Put that platter on a damp tea towel: Turkeys are slippery. The distance from platter to shatter can be short.


I don’t use precise measurements to make gravy: Everything depends on the weight of the turkey, how much fat you add, and how much juice and fat the bird releases.  Once the turkey’s done, remove it from the roasting pan with the lifter you raced out to buy when you started to read this recipe. 


A reliable gauge to a turkey’s “doneness” is its wiggly leg; if you aren’t sure, use a meat thermometer. Or (the belt-and-suspenders method), use both. 


Tent the turkey lightly with foil and allow to rest (10 min. for most meats; 20 min. for a sizable turkey) before carving. Don’t wash the roasting pan!


Heat the drippings in that same roasting pan over medium-high heat. Sprinkle in just enough all-purpose flour to absorb most of the fat in the pan. Whisking quickly, thoroughly combine the fat and and all-purpose flour, adding extra flour as needed. Continuing to whisk, let bubble about 1 min. over medium-low heat. 


Gradually add homemade or commercial broth (see One Click: How to Make Stock), as well as the cooking water from potatoes or other non-cruciferous (look it up, Dollinks) vegetables on the menu. The term non-cruciferous is important: No one wants a fart-fest at the dinner table.


Whisk, whisk, whisk until gravy reaches desired thickness. Gravy thickens on standing, so don’t be too heavy-handed with the flour. If floating fat remains on the surface, add a little more flour and liquid or simply skim off the fat.


Season to taste (and do taste it!) with garlic powder, salt, pepper, and any herb or combination of herbs, to taste. You may want to add a splash of red wine (for meats) or white (for poultry) to flavor your gravy, or sliced mushrooms, or a spoonful of Dijon-style mustard. 


You may also want to “cheat” by adding a gravy browning agent or a poultry-flavored concentrate, at this point. There are plenty of brands available: All produce attractive, nicely colored gravy. 


Because this gravy may contain bits of poultry (or meat) and the occasional flour lump, strain and reheat it before transferring it to your gravy boat. Stirring the flour into cold broth before adding it to hot gravy may slightly reduce the number of lumps, but the best gravies are strained and smooth. Substitute cornstarch for flour at your peril: The result is often a far thinner, less “substantial” gravy, suitable for anaemic folks who want a pale drizzle, but not for those with heartier expectations.


I’ve had cornstarch-thickened gravy in chi-chi dining rooms, and found it disappointing. If you’re going to have gravy, for goodness sake, have gravy! You don’t do this everyday, so enjoy the splurge! 


Note: I like to make lots of gravy. Leftover gravy is a superbly reliable addition to homemade soups, stews, and dishes such as turkey pies. For more turkey recipes, see One Click: Turkey.


Sunday, November 21, 2021

Cauliflower Crisps

This terrific appy comes from my dear friend Nancy, of Surprise, Arizona, whose mother once made them. Nancy used to eat the leftovers straight from the fridge. When I recently tried these Crisps, we ate them hot, but the next day ... Straight from the fridge! Eating them as fast as we did, we didn’t pause for a photo! 

Cauliflower Crisps:


1 medium cauliflower, rinsed. dried, exterior leaves removed

2 c. (500 mL) Bisquick commercial biscuit mix

2 large eggs

1 c. (250 mL) milk 

1/3 c. (80 mL) shredded Romano or Parmesan cheese

Garlic powder, to taste

Parsley leaves, fresh or dried, to taste

Salt and pepper, to taste

Vegetable oil, for frying in skillet


Trim cauliflower into 1-1/2 in. (3.5 mm) florets. Cook until “al dente,” about 2 min. Immediately chill in cold water. Pat dry with paper towel; set aside.


In medium bowl, combine remaining ingredients, mixing until smooth. Heat skillet on medium, Dip cauliflower into batter until well coated, frying 8-to-10 pieces at a time until golden on each side. Briefly rest on paper towel to absorb excess fat. Serve at once. Yields 3 or 4 portions.


Note: Don’t add liquid to the batter until moments before you’re ready to dip the florets. Nancy prefers to cut each floret in half before dipping it. 


I, on the other hand, found the slightly larger pieces worked well, while still hand-holdable. Nancy’s method uses more of the delicious batter; I had some left over ... in other words, wasted. 


The depth of oil in the skillet will affect your cooking time. I used about 2 in. (5 mm) of oil in my skillet, with the heat at medium-high. Nancy uses less oil, sautéeing the battered florets, rather than deep-fat frying them. This is a matter of personal preference. Although I used more oil than Nancy does, I strained the used oil, and refrigerating it in a clean jar, so that none was wasted. Sauté or deep-fry a test piece before proceeding.  

Tuesday, June 8, 2021

Mushroom and Cheese Scalloped Potatoes

I tore this recipe from a page in an old magazine. After all, who doesn’t like scalloped potatoes? To my amazement and delight, they were the best scalloped potatoes I’ve had in years - and definitely, the easiest to prepare. 


Perfect exactly as is, I won’t even pretend to modify this recipe. Sadly, I can’t give credit where credit is due because I have no idea who came up with this little gem. I’ve numbered the steps because - while this recipe is super-easy, it’s also easy to get confused with this may layers in any dish.


Mushroom and Cheese Scalloped Potatoes:


One 10 fl. oz. (284 mL) can condensed cream of mushroom soup

1 c. (250 mL) light cream

1 c. (250 ml) shredded sharp cheddar

1/8-to-1/4 tsp. (1.2-to-2.5 mL) pepper

6 c. (1.5 L) potatoes, thinly sliced and peeled

1 medium onion, thinly sliced

1/4 c. (60 mL) dry bread crumbs

2 tbsp. (30 mL) grated (commercial “shaker-style”) Parmesan cheese


Preheat oven to 350 deg. F. 


Step 1: Add soup, cream, cheese, and pepper to bowl, mixing well. 

Step 2: Place half potatoes in spray-greased 2 qt. (2 L) casserole dish. 

Step 3: Top with all of onions. 

Step 4: Spoon half of remaining soup mixture over onions. 

Step 5: Top with remaining potatoes and soup mixture. 


And now … Combine bread crumbs and Parmesan. Sprinkle over casserole. Bake 40-to-45 min., or until potatoes are soft when pricked at center of casserole with a sharp paring knife.


PS: I took a photo of this delish dish, but frankly, it looked like up-chuck. Anything looks better with parsley. Unfortunately, I had none. My kitchen advice: 


Step 1: Make this wonderful recipe. 

Step 2: Buy parsley.

Tuesday, March 30, 2021

Glory Bowl

When Canadian chef Shelley Adams invented this recipe some 20 years ago, she probably had no idea what a runaway sensation it would be! Named after a back-country North American ski bowl, this delicious combination of ultra-nutritious foods is the single best salad/main dish I’ve ever had. No one pays me to say stuff like this … I’m completely sincere. If your local grocer doesn’t stock nutritional yeast flakes, you’ll find them in the bulk foods section of a health foods store, or online. 


Glory Bowl: 


To Prepare the Salad:


2 tbsp. (3o mL) canola oil

2 c. (500 mL) cubed extra-firm tofu

8 c. (2 L) hot brown rice (see Note) 

2 c. (500 mL) grated carrots, peeled, raw

2 c. (500 mL) grated beets, peeled, raw

2 c. (500 mL) packed baby spinach leaves, washed, stemmed, uncooked

2 c. (500 mL) slivered almonds, toasted


Ready to serve: Glory Bowl

In large skillet, heat oil over medium-high heat. Sauté tofu, stirring frequently until brown and crispy, about 10 min. Drain on paper towel. Divide rice among 8 bowls; drizzle each with 1 tbsp. (15 mL) dressing. Top each bowl with tofu, carrots, beets, spinach and almonds, drizzling each serving with an additional 3 tbsp. (45 mL) dressing.


Note: If you need to, see How to Cook Rice, with reference to the section on brown rice.


To Prepare the Dressing:


1/2 c. (125 c.) nutritional yeast flakes

1/3 c. (0.333 mL) tamari or light soy sauce

1/3 c. (0.333 mL) apple cider vinegar

1/3 c. (0.333 mL) water

2 tbsp. (30 mL) tahini

2 medium-sized cloves garlic, peeled and crushed

1-1/2 c. (375 mL) canola oil


In blender, purée nutritional yeast flakes, tamari or light soy sauce, vinegar, water, tahini and garlic. With motor running on low, add oil in slow, steady stream. Blend until smooth. Serves 8 grown-ups or 12 intelligent, nutritionally aware children.


(Tip: You can make this excellent dressing in advance. Covered and refrigerated, it keeps up to a week.)

Saturday, March 27, 2021

Another! Lasagna Recipe from Cookbook Star Margo Oliver

Librarian extraordinaire Nathan has been researching, again! And what he’s found will interest lasagna lovers everywhere. Although I’ve been busy in my kitchen, I’ve also been busy with a large project that’s eating up the hours, weeks, and months. 


With a brain the size of a pea pod, I can’t blog and chew gum at the same time. 


Nathan to the rescue with yet another Margo Oliver lasagna recipe a blog reader requested. Says Nathan: “Always happy to do digging for things like this. We don’t get as many fun reference inquiries as we used to anymore …”


So remember your local library and librarians as an excellent source for those old recipes you’re seeking. This oldie but goodie dates to 1967: